
This section is organized as follows:
- Defining a Pool and Lanes
- Change the Identifier, Name and Description of the Process
- Defining Start / End Events
- Defining a User Task
- Defining a Service Task
- Defining a Call activity
- Defining an Exclusive Gateway
- Defining a Service task that sends an email-notification
- Defining a Service Task to Change the Status of an Asset
- Defining a Service Task that Moves an Asset between Domains
- Defining a Service Task that Adds Attributes to an Asset
- What is a form type?
- What is a user expression?
- What is a business item?
Once you create a new Activiti diagram file, and you do not intend to import existing XML code, Workflow Definition design starts from drawing a Pool and then a set of Lanes for each role in the process.
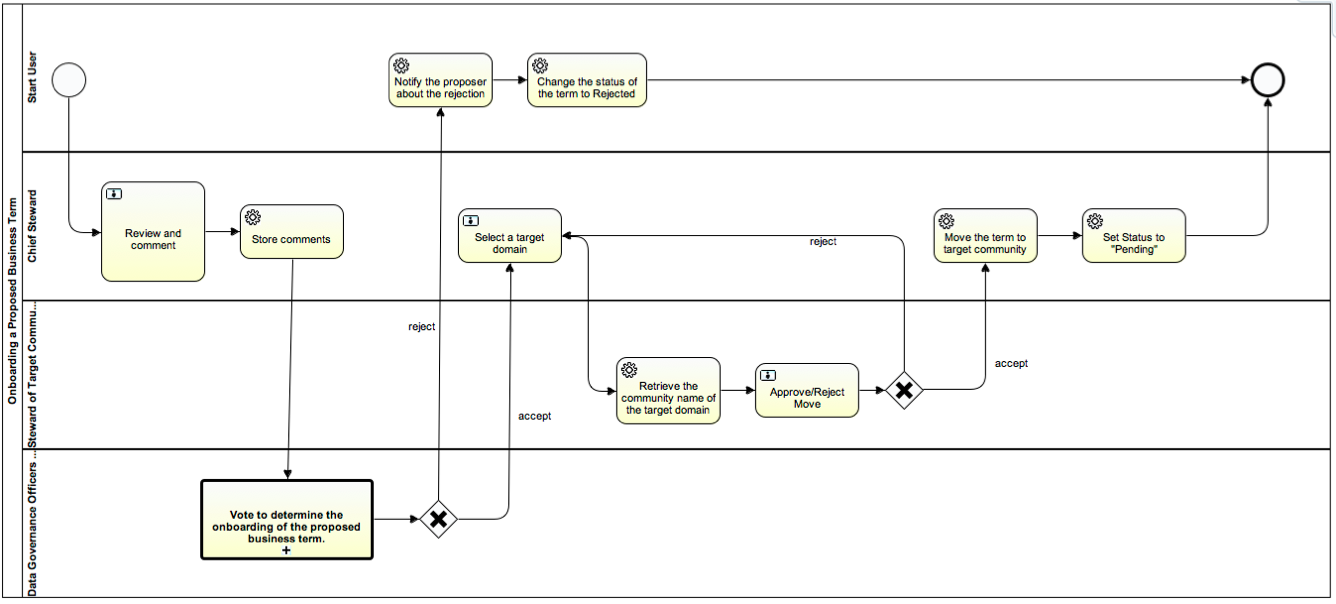
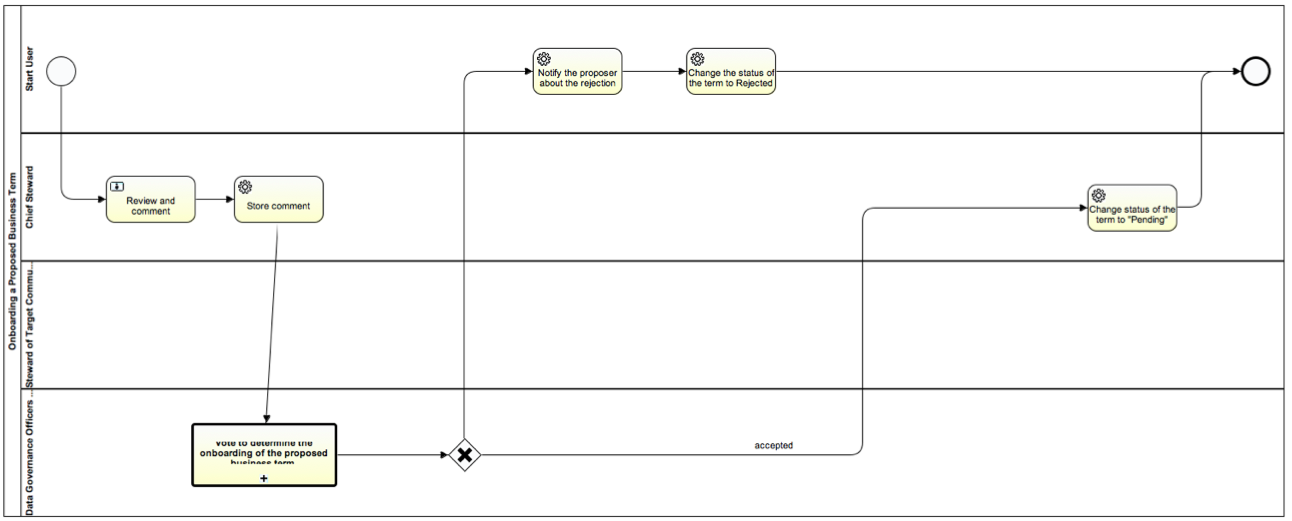
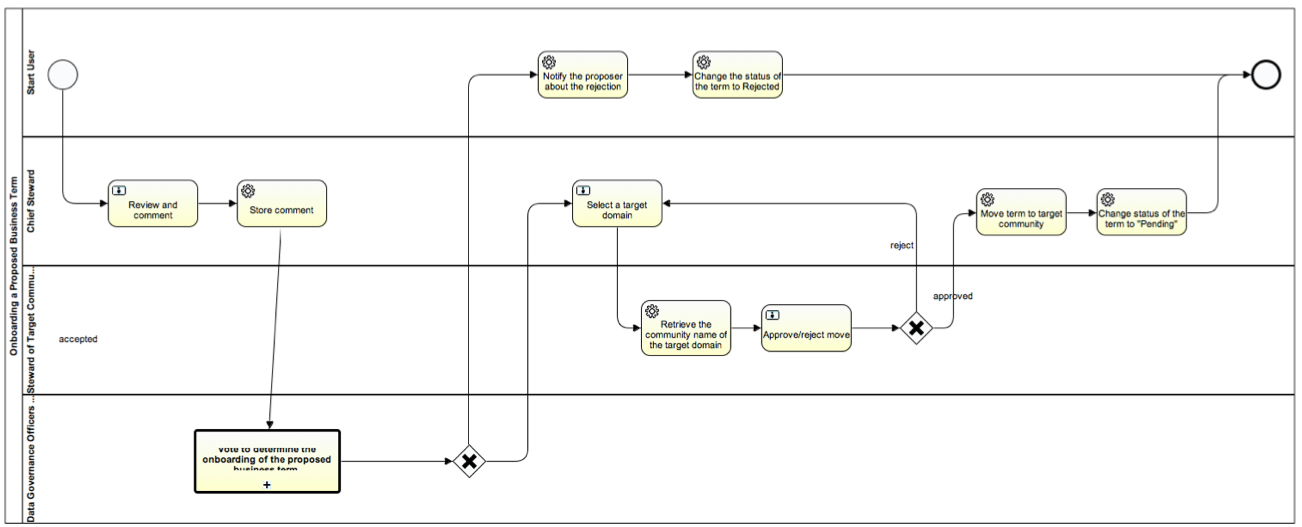
For this exercise we will create an “business term on-boarding” Workflow Definition, illustrated below, from scratch. The on-boarding Workflow Definition will be started automatically after a new Business Term was proposed via the dashboard. It goes as follows:
- the start User is anyone logged in and who proposed the Term;
- the user with role Chief Steward reviews the proposed Term and provides a motivation – negative or positive;
- the users with role Data Governance Officers, based on the motivation, vote to reject/accept the onboarding of the Term;
- if accepted, the Chief Steward selects a target Domain for the Term;
- the user with role Steward of the selected target Domain accepts/approves the move of the Term;
- if accepted, the proposed Term is automatically moved to the target Domain and its Status is changed from “candidate” to “pending”.
Although at first sight looking complicated to reproduce, the Workflow Definition has a lot of repetitive Tasks that much correspond to “design patterns”. Therefore, we will be reusing as many existing Task configurations as possible from the examples we have shipped in DGC.
Defining a Pool and Lanes
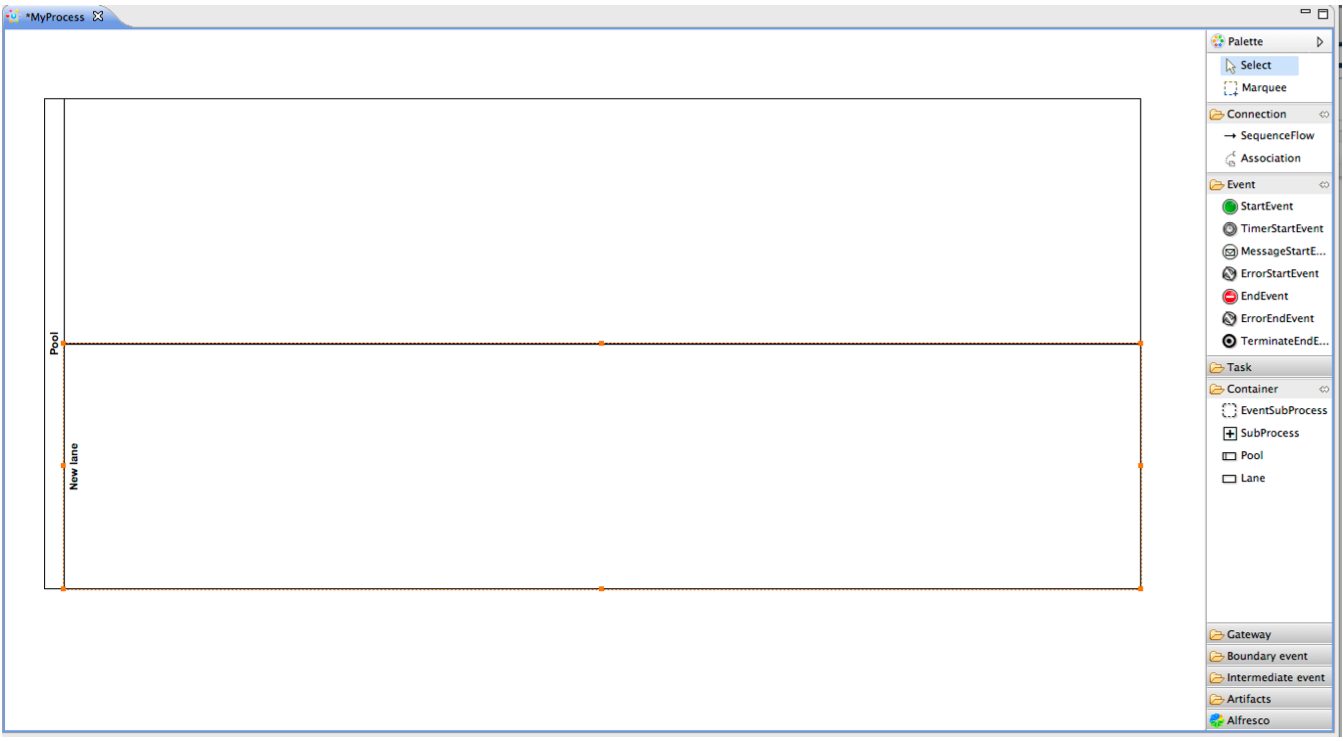
Go to the palette on the right and from the containers menu select Pool. A Workflow has exactly one Pool, so draw one on the blank surface. Next, draw within this Pool, two Lanes. The result should look as follows.
If you click on each of the elements, the tool will update the properties pane on the bottom. If you click outside the Pool, you see to the properties of the process. Now we change the names of the Pool and Lanes:
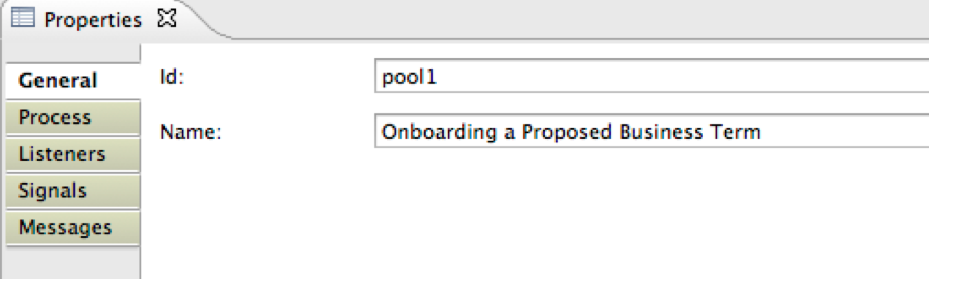
- Click on the Pool;
- click on General tab in the Properties pane;
- enter the Name of the process as depicted below. We leave the Id unchanged, just like the other parameters.
Now do the same for the Lanes: change the name of the top Lane to “Start User” and the second one to “Chief Steward”. Do the same for the 2 additional Lanes “Data Governance Officers” and “Steward of the Target Community.
Change the Identifier, Name and Description of the Process
[bok-callout type=”orange”]Process Id
CAUTION The process Id is the only true identifier for a Workflow Definition. The name nor the filename of the process are not unique. When you deploy a new Workflow Definition from a file in DGC, it will override any Workflow Definition with the same Id. This may result in unintended loss of content.[/bok-callout]
In order to change the identifier of the process, you have to go to the properties of the Pool. Therefore, do the following
- Click on the title bar of the Process pool so can see the whole Pool is selected by a red dashed box. On the bottom you can see the Properties.
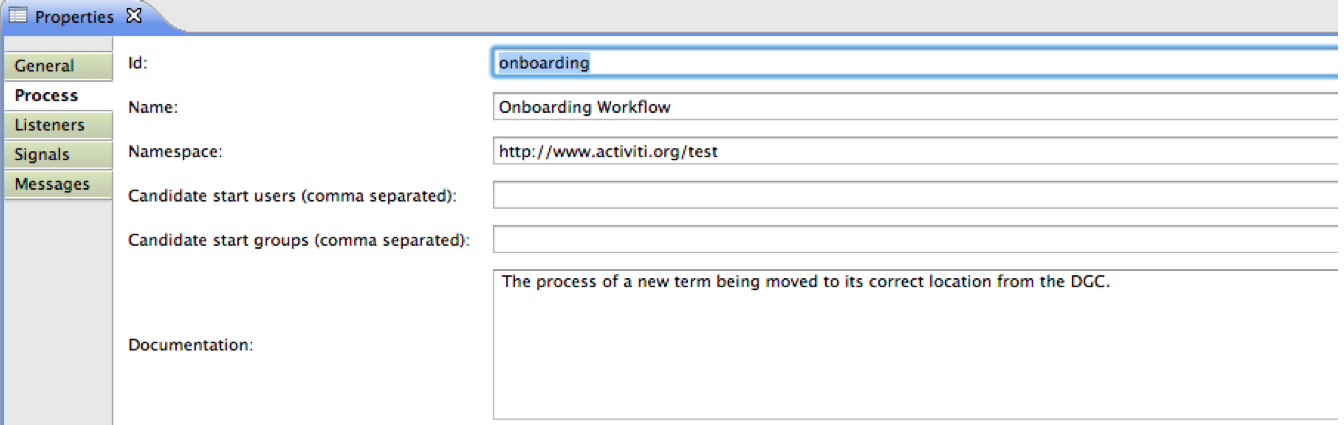
- Click on the Process tab in the Properties pane.
- Give your process a Name, e.g., “My Personal Asset Onboarding Process”
- Change the process Id to something unique, e.g., “onboarding”. Note that the only unique identifier of your process is its id, not its name. This is important because if you later deploy the workflow in the DGC, it will override any deployed workflow with the same identifier.
- Enter a description in the Documentation field.
- Leave the other parameters empty.
Defining Start / End Events
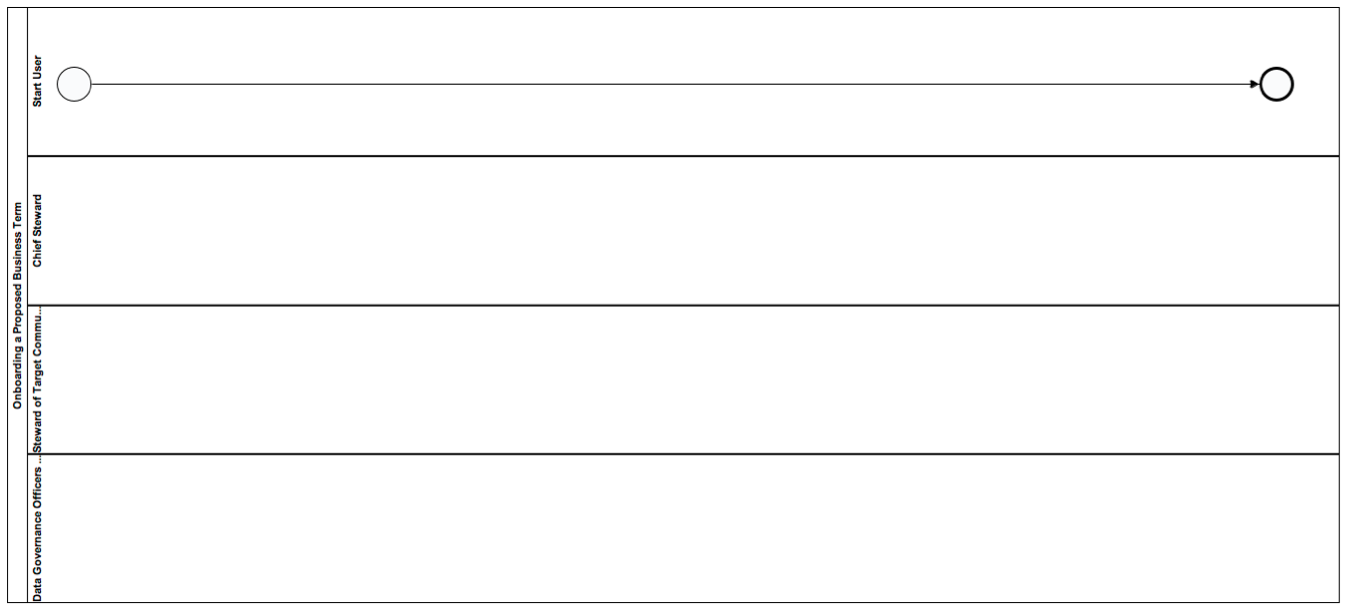
We create a Start Event and an End Event, two essential elements, as follows:
- Select Start Event from the Event palette on the right;
- draw it in the first Lane;
- do the same for the End Event;
- by hoovering over the Start Event a menu appears. Click and hold the arrow button and drag it to the circle of the End Event.
The result should look like the picture below. As you add Tasks always make sure Start and End Events are always connected so the Workflow Definition is executable at each stage of the design.
Before adding Tasks, we set the initial variables for the Workflow Definition by editing the properties for Start Event. First read the article “How to port a workflow out from DGC into Activiti?” to get an initial understanding of Workflow Definition properties of the global Workflow Definition “Propose New Business Term”. The following snapshot shows the form properties in the Start Event we need for this process. You can define them all at once, or gradually as their need arise.

First, as rule of thumb, it is useful to define a userExpression for every role (hence lane) you have in your workflow, except for the start User. These variables will be configurable when the workflow is deployed in the DGC environment. This prevents the need to always go back to Activiti to change the values. Thus our Workflow Definition has three user expressions variables:
- chiefStewardUserExpression
- dgoUserExpression
- stewardUserExpression
Next, we declare a number of variables for the voting process further down the task sequence.
- voteAcceptNewTermPercentage
- newTermWarningTimeDuration
- newTermTimeOutDuration
We will explain these when we come to the voting sub-process.
Note that all form variables are not readable and have a default value. This means the User is not prompted for input or does not even see them: they are only visible in the Workflow Definition configuration pane of DGC.
[bok-callout type=”green”]Whenever you have a Workflow Definition design in mind that involves collaborative decision making, simply copy the configuration of this start event. As we will see further again, most workflows design is considered with copying parts of other workflows. Activiti has no WYSIWYG way of copy-pasting but you can do it easily by opening the XML editor. Consider following XML snippet of our Start Event:
 <startEvent id="startevent1" name="Start" activiti_initiator="startUser">
      <extensionElements>
        <activiti:formProperty id="stewardUserExpression" name="Steward User Expression" type="string" default="role(Steward)" readable="false" required="true"></activiti:formProperty>
        <activiti:formProperty id="voteAcceptNewTermPercentage" name="Vote Accept New Term Percentage" type="string" default="100" readable="false" required="true"></activiti:formProperty>
        <activiti:formProperty id="newTermWarningTimeDuration" name="New Term Warning Time Duration" type="string" default="P5D" readable="false"></activiti:formProperty>
        <activiti:formProperty id="newTermTimeOutDuration" name="New Term Time Out Duration" type="string" default="P10D" readable="false" required="true"></activiti:formProperty>
        <activiti:formProperty id="dgoUserExpression" name="Data Governance Officer" type="string" default="role(Data Governance Officer)" readable="false" required="true"></activiti:formProperty>
        <activiti:formProperty id="chiefStewardUserExpression" name="Chief Steward" type="string" default="role(Chief Steward)" readable="false" required="true"></activiti:formProperty>
      </extensionElements>
    </startEvent>
If you want to reuse this configuration in another Workflow Definition then:
- create a new start event and save.
- close the Activiti diagram editor;
- re-open in the XML editor;
The start event will look as follows, empty:
<startEvent id="startevent1" name="Start"></startEvent>
So simply paste in the extension elements between the tags and within the starting tag any other variable (like initiator) you want to take over. Afterwards save and close. Reopen in the diagram editor and you will see the variables in place.
[/bok-callout]
Defining a User Task
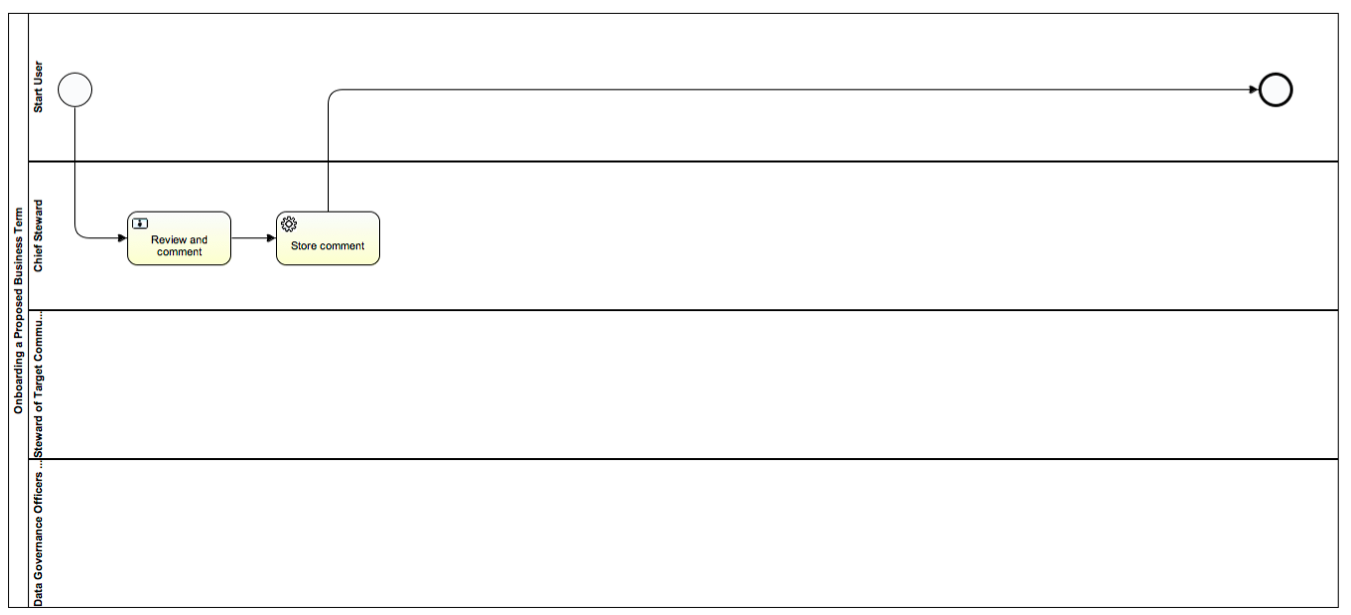
Now we introduce the first User Task prompting the Chief Steward to review and provide comments. With Chief Steward here we mean the User that holds the role of Chief Steward within the Domain where the Term is stored, i.e., “New Business Terms”. We also create a Service Task to store the comment using a call to a method in the API. Change the names of the User Task and service task by going to the general properties.
- click on User Task in the Task Palette on the right-hand side of the diagram editor;
- draw a User Task in the Chief Steward Lane;
- click on Service Task in the Task Palette on the right-hand side of the diagram editor;
- draw a Service Task in the Chief Steward Lane next to the user task;
- redirect the Sequence Flow arrows so that start and event are connected through the sequence of these new tasks;
- Click on User task;
- Click on Main config tab in the properties window;
- Change the Name of the Task to, e.g., “Review and comment”.
Repeat the last three steps for the Service Task with name, e.g., “Store comment”.
The result should look like follows.
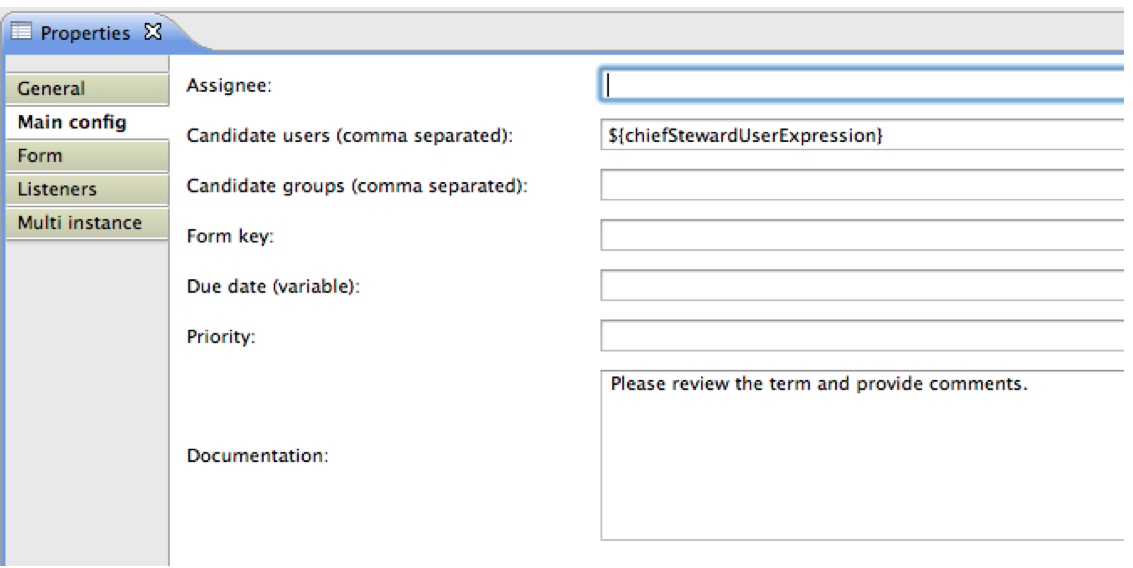
For the “review and comment” user task we need two things. First, the task is to be assigned to the Chief Steward as candidate User:
-
- click on the Main Config tab in the properties window
- enter as Candidate User (not Assignee) the following expression: ${chiefStewardUserExpresion}
- enter as Documentation the following message to the candidate user: “Please review the term and provide comments”.
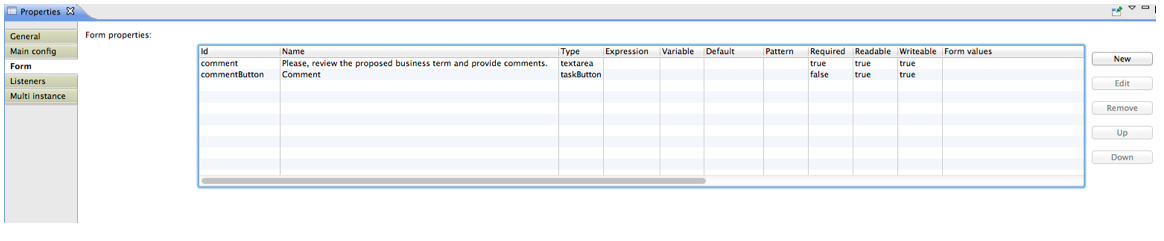
Secondly, a form to pop-up with a text area and a button to save has to be created:
- Click on the Form tab in the properties window
- Click on New to create 2 new variables as shown below.
Defining a Service Task
Once the user has filled in the form in the comment and review user task, this Service Task persists it in the DGC operating model by an expression to calls a designated commentComponent.
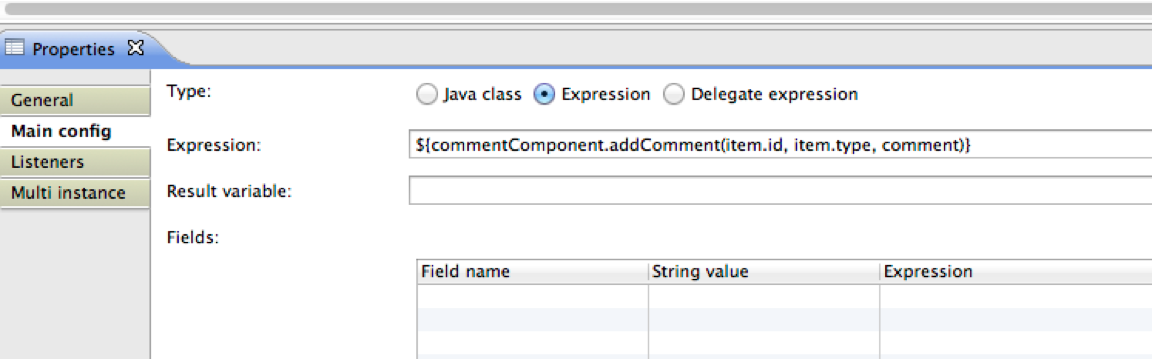
“Item” refers to the Business Item (Asset) on which our workflow is applied to. Any “non-global” workflows need to access or change the Business Items they run on. To that purpose there is an “item bean” that is referred to be the global variable “item”. For every item we can call the generic API representationComponent, but in the case of a Domain we can call more specific functions using vocabularyComponent. For more info, refer to the API documentation. Whenever u need to add a comment to an asset you can copy this expression. Note: there are other ways to do this, which you will discover if you go through similar tasks in the out-of-the-box Workflow Definitions.
Now we have a Workflow Definition that does something useful, so we can try to deploy it. Save your file and close all windows. See article “How to deploy a Workflow Definition?” for further instructions.
Defining a Call activity
A Call Activity calls another Workflow Definition that is deployed in the Operating Model. For our exercise, we create a Call Activity that calls “Voting Subprocess”, which is a general-purpose out-of-the-box Workflow Definition. After providing comments, we want the data governance officers to vote for the onboarding of the proposed Term based on the comments provided by the Chief Steward. We do the following:
- select Call Activity in the Task Palette on the right-hand side of the diagram editor;
- draw a Call Activity in the lane of the Data Governance Officers;
- click on the Task;
- Click on Main Config tab in the properties window;
- Change the Id of the task to semothing unique and meaningful: e.g., “vote_to_determine_onboarding”;
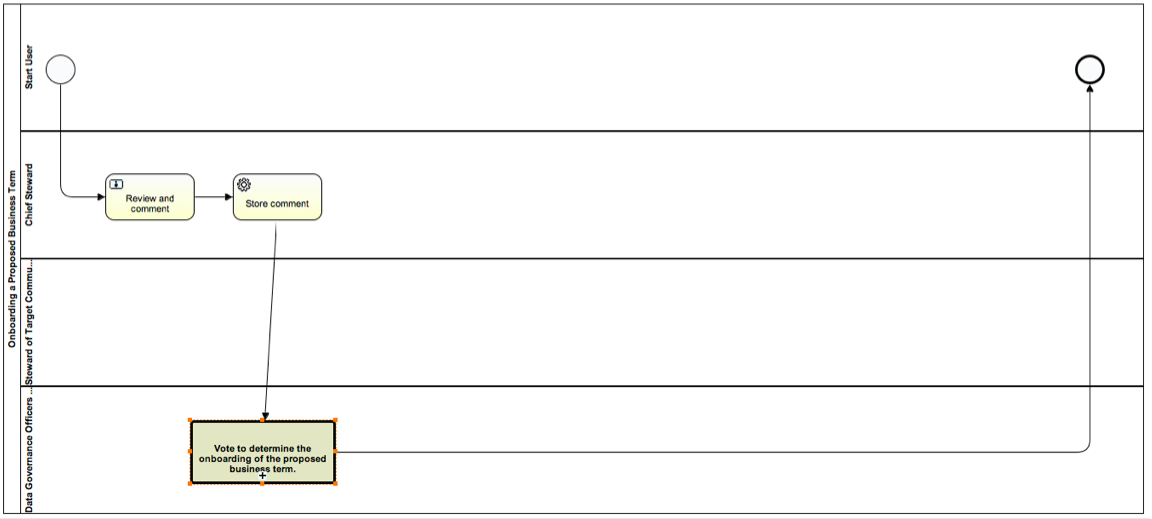
- Change the Name of the Task to, e.g., “Vote to determine the onboarding of the proposed business term”.
The result looks as follows:
The Call Activity is still an empty box. Therefore, we have to set the Workflow to be called when the task starts, i.e., the out-of-the-box Voting Sub Process:
- click on the Call Activity “Vote to determine the onboarding of the proposed business term”;
- click on Main Config in the properties window;
- enter the process Id of the Voting Sub Process to be called, that is: votingSubProcess.
Next, we map the variables of our workflow with those of the called workflow:
- click on Main Config in the properties window;
- click on Newright of input parameters table to add a new input parameter for this task:
- Source: the form variable we define locally in the start event of this workflow;
- Source expression: filled in as an alternative to source;
- Target: a variable of the called workflow that should take the source variable or expression as input.
- click on New right of output parameters to add a new output parameter for this task:
- Source: the variable of the called workflow
- Target: the local variable that takes the value.
The result to be achieved is shown below:

We add the following input parameters to specialise the Voting Sub Process to this sepcific context:
- a source expression ${“Please decide whether you accept or reject this proposal for a new term. Also substantiate your decision with a comment.”} will be mapped on target decisionInfo, which is used by Voting Sub Process as task message;
- source variable (we declared in the Start Event) dgoUserExpression maps on voterUserExpression in Voting Sub Process to indicate that the voters will be the users with the role Data Governance Officer;
- a source expression ${100} with target votePercentage to indicate the voting threshold is by defualt unanymous (100%).
- a source expression ${true} with target addComments to indicate that the voter can provide comments or not.
- a source expression ${true} with target earlyComplete to indicate that whenever sufficient votes have been collected the voting can be closed. E.g., if votingPercentage is 100% then one reject is enough to stop the voting process.
- source form variable newTermWarningTimeDuration maps on voteWarningTimeDuration in Voting Sub Process to indicate the time period before a reminder is sent to voters who did not vote yet.
- source form variable newTermtimeOutDuration maps on voteTimeoutDuration in Voting Sub Process to indicate the time period after which the voting process times out, and all votes are counted.
- a source expression ${“Approve/Reject”} with target voteButtonLabel to set the text to appear on the button of the voting task.
- a source expression ${“Approve or reject proposal for a new term”} with target voteTaskName to set the name of the voting task.
Finally, there is one output parameter to pass on the voting result, i.e., votingResult.
[bok-callout type=”green”]TIP The above example clearly demonstrates that the Voting Sub Process can be adopted for any task where one or more users have to make a decision about something. Always reuse this Workflow Definition whenever such a need arises, and copy the parameters as they are defined by default. You can then tweak them to fit your own needs.[/bok-callout]
Defining an Exclusive Gateway
The voting process returns the result as a Boolean true or false. The next step is to introduce an Exclusive Gateway that will lead the workflow in two different ways depending on the voting outcome. This happens as follows:
- Select Exclusive Gateway in the Gateway Palette;
- draw an Exclusive Gateway right next to the voting call activity in the Data Governance Officers lane;.
- redirect the flow sequence arrows so that:
- call activity leads to the gateway;
- the Exclusive Gateway as two outcomes both flowing to the end event;
- click on each of the Sequence Flows going out of the exclusive gateway;
- click on the General pane in their configuration window
- change the name of the Flows to “accepted” and “rejected” respectively.
The end result looks as follows:

Next, we add conditions to each of the Sequence Flows so that the Workflow knows which direction to follow. Note these conditions must be mutually exclusive. In our context, we will use the output parameter “votingResult” from the call activity.
- Click one the Sequence Flow with name “accepted”
- Click on the Main Config pane in the properties window;
- Enter as Condition: ${votingResult.votingResult}.
For the other sequence flow we do the opposite by adding ‘!’ in front of the condition:
- Click one the Sequence Flow with name “rejected”
- Click on the Main Config pane in the properties window;
- Enter as Condition: ${!votingResult.votingResult}.
We could deploy this workflow and test if it has all the desired behavior. However, currently there is no way to see the difference in behavior based on the voting outcome. Because of this, we have to add some tokens after the exclusive gateway. Examples are:
- sending an email notification about the rejection or acceptance of the proposed term;
- setting the status of the term to “rejected” or “pending” respectively.
- introducing a number of other tasks – such as moving the term to a more specific domain in case the onboarding has been accepted.
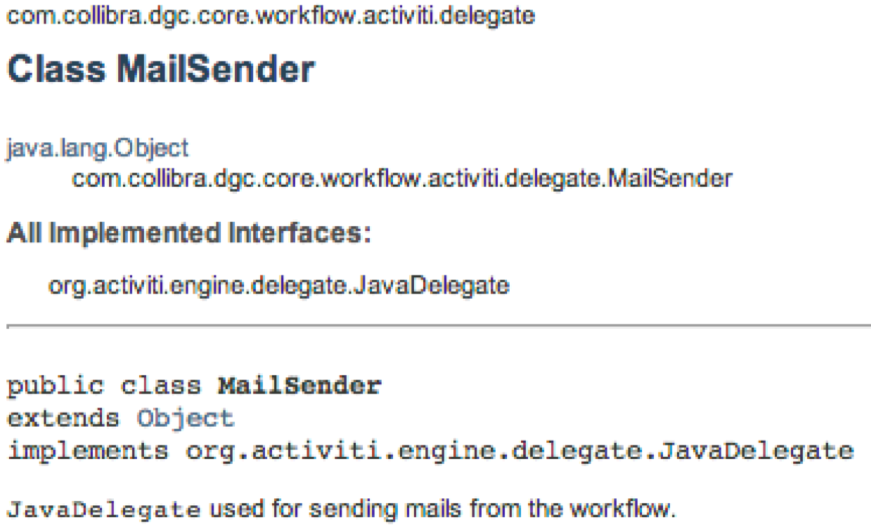
Defining a Service task that sends an email-notification
According to our design, the proposer (start user) is being notified and the status of the term is set to “rejected” if the voting turns out negative. Therefore:
- Create one Service Task with Name “Notify proposer” and Id “notify_rejection” in the start user lane;;
- Redirect the Sequence Flow with Name “rejected” to this new service task”;
- Draw a Sequence Flow from the new service task to the End Event.
The result looks as follows:

Next, we configure the service task to call upon a service that will send an email with a certain message to the start user:
- click on the Main Config tab in the properties window;
- select Type “Java class”;
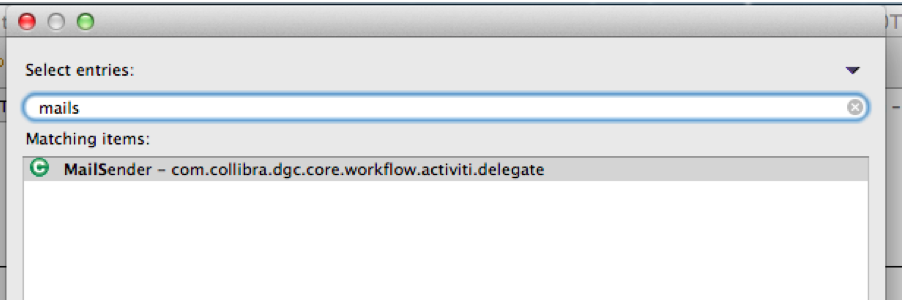
- click the button “select Class” and type the first characters of MailSender. The autocomplete will reveal the complete class name (see below);

- Click OK;
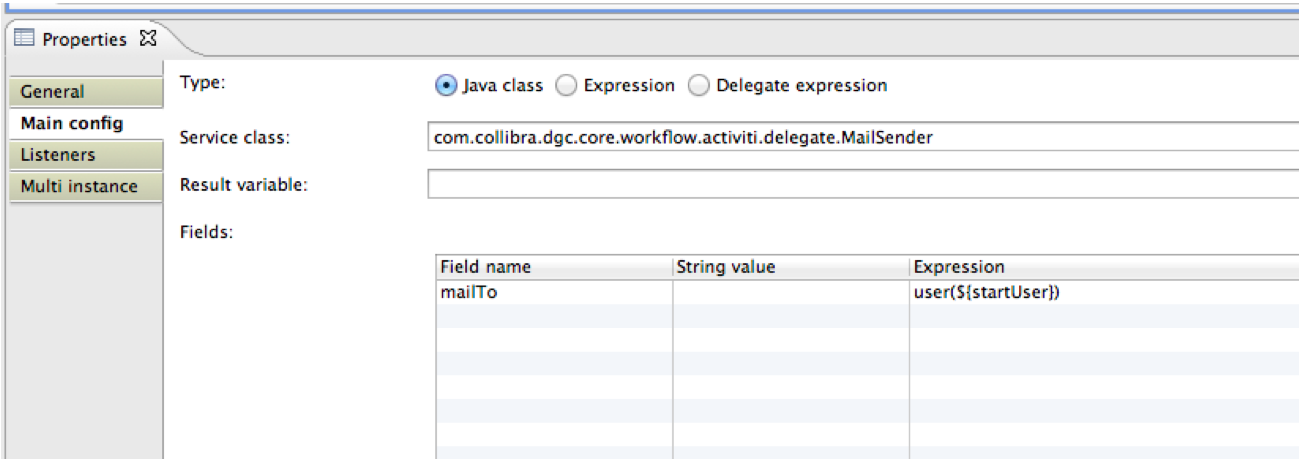
- Create a new Field with field name “mailTo” and expression “user(${startUser})”.
[bok-callout type=”orange”]NOTE It is important that the field name is exactly as it is shown above because the method MailSender will not recognize it otherwise.[/bok-callout]
The result looks as follows:
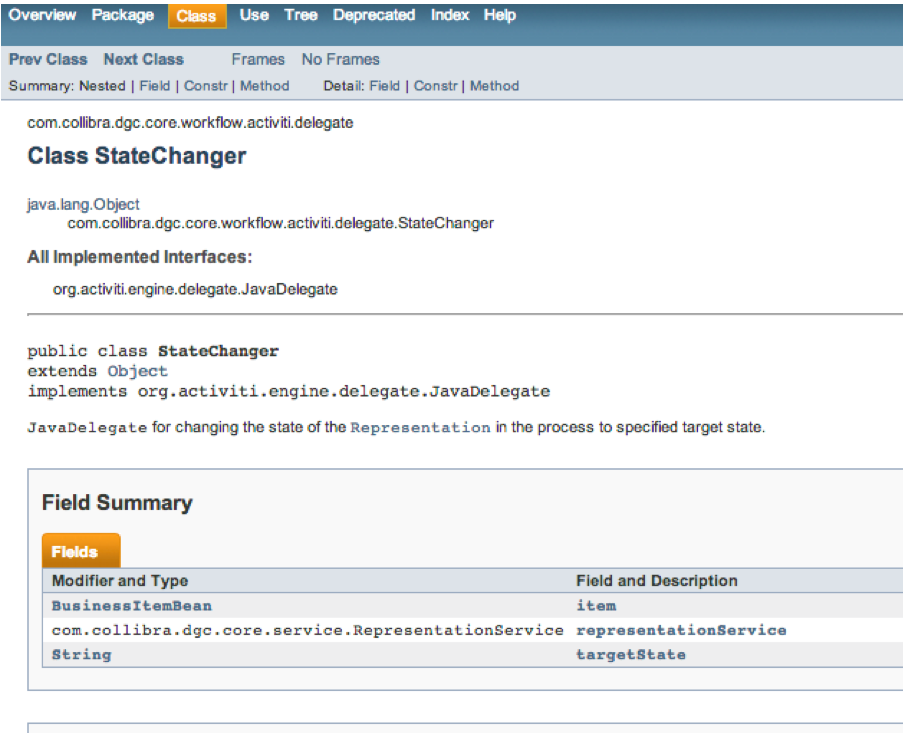
If you want more information about the fields the MailSender delegate is using, go to the Java documentation hosted by your instance. To do this, browse to the URL: “http://dg.example.org/docs/java/index.html“ where you replace dg.example.org with your own URL. Then, search for the class “MaliSender” in the package com.collibra.dgc.core.workflow.activiti.delegate, as shown below:
Defining a Service Task to Change the Status of an Asset
In our running example, if the term has been rejected we want to set the Status to “Rejected”. To this end:
- create a new Service Task with Name “Set status to “rejected” and Id, say, “change_status_to_rejected” in the start user’s Lane;
- redirect the Sequence Flow going out of the previous task to this new Service Task;
- draw a new Sequence Flow from the new Service Task to the end event.
- create a new Service Task with Name “Set status to “Pending” and Id, say, “change_status_to_pending” in the chief steward user lane and redirect the sequence flows along the accepted branch;
The end result looks as follows:
Next we configure the Service Task to call upon a service that will change the Status of the Term to “rejected”:
- click on the Main Config tab in the properties window;
- select Type “Java class”;
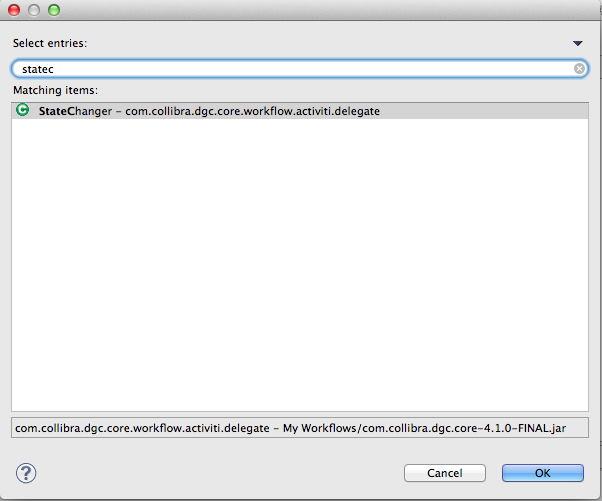
- click the button “select Class” and type the first characters of StateChanger. The autocomplete will reveal the complete class name (see below);
- Click OK;
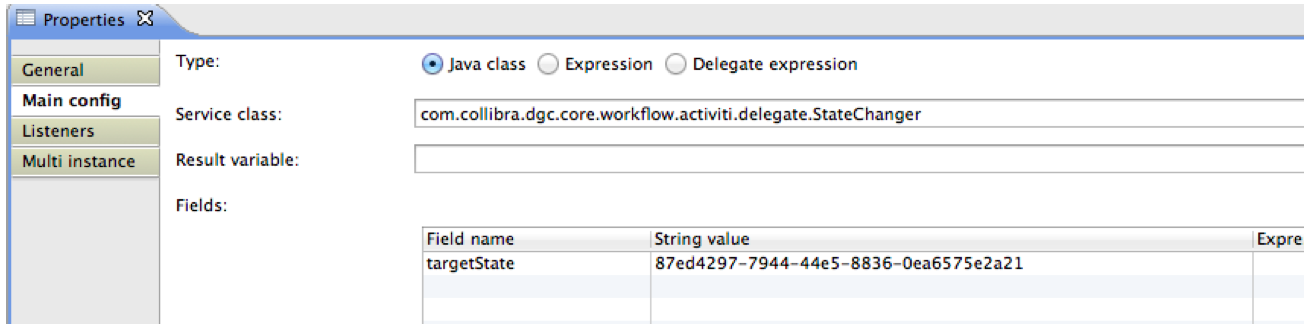
- Create a new Field with field name “targetState” and expression “87ed4297-7944-44e5-8836-0ea6575e2a21” being the UUID of the status type “Rejected”.
[bok-callout type=”orange”]It is important that the field name is exactly as it is shown above because the method StateChanger will not recognize it otherwise. Also make sure that the status Type “Rejected” is defined in the Operating Model when deploying and testing the workflow. Moreover, it may be that in your instance the status type has a different UUID.[/bok-callout]
The result looks as follows:
Now, follow a similar procedure for the other service task to change the status to “pending”.
If you want more information about the fields the StateChanger delegate is using, go to the Java documentation hosted by your instance. To do this, browse to the URL: http://dg.example.org/docs/java/index.html where you replace dg.example.org with your own URL. Then, search for “statechanger” in the package com.collibra.dgc.core.workflow.activiti.delegate, as shown below:
Defining a Service Task that Moves an Asset between Domains
If the term on-boarding has been accepted, as proposed by the running example design in the beginning of this section, we want to assign a task to propose a domain to move the term to the chief steward. To do this we need to do the following:
- Create one User Task with Name “Select a target domain” in the Chief Steward lane;
- Create one Service Task with Name “Retrieve the community for target domain” in the Steward lane;
- Create one User Task with Name “Approve/reject move” in the Steward lane
- Create an Exclusive Gateway in the Steward lane;;
- Create a Service Task with Name “Move term to target community” in the Chief Steward lane;
The result looks as follows:
The User Task with Name “Select a target domain” should produce a form with a area to select an existing domain and a button. We do this as follows. This is similar to the earlier exercise about the workflow “Propose New Business Term” where we prompted the user for selecting related assets.
- click on Main Config in the properties window;
- enter for “Candidate Users expression “${chiefStewardUserExpression}” to indicate the assigned role;
- click on Form” in the properties window;
- enter a new property, say “chooseDomain”, which is of type “vocabulary”;
- Note, if not done explicitly like shown here, a default OK button is added automatically to the form.
Below, the corresponding property screens:

The Service Task with Name “Retrieve the community for target domain” takes the value for variable chooseDomain and looks up the community in which it resides. This is a intermediate step in order to retrieve the steward of the community. We need to identify this role because of the subsequent task.
- click on Main Config in the properties window;
- enter the following Java Expression: ${vocabularyComponent.getVocabulary(chooseDomain).getCommunity().getName()};
- this expression retrieves the name of the community in which this domain (read: vocabulary) is resided. Therefore it uses the vocabularyComponent in the API;
- enter the Result Variable and called it something like communityName;
Below, the corresponding property screens:

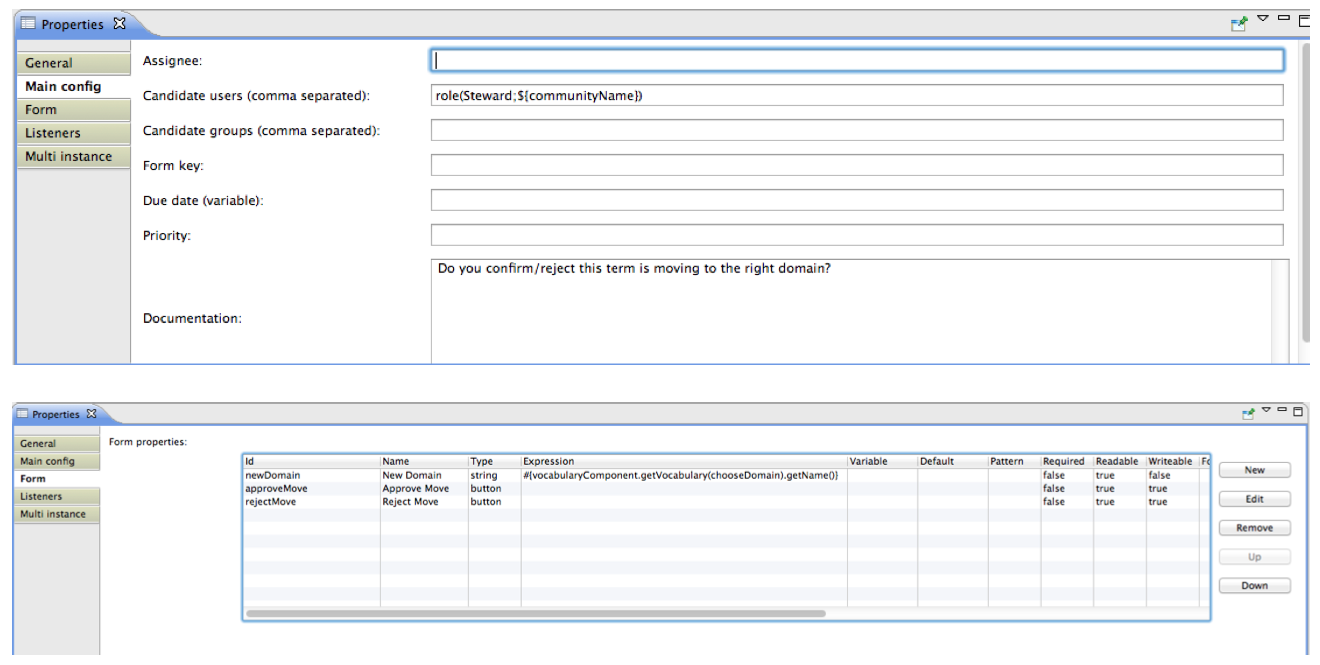
Now, the User Task with Name “Approve/reject move” prompts the steward of the target community to approve or reject the move to one of his/her domains. The steward assigned for this task can be retrieved based on the name of the community stored in the result variable “communityName”. The form shown to the user shows the chosen target domain, and approve and accept buttons.
- click on Main Config in the properties window;
- enter for “Candidate Users expression “role(Steward;${communityName})”;
- this expression binds to the user(s) who have the role of Steward in the community with name “communityName”;
- enter for Documentation something informative like”Do you confirm/reject this term is moving to the right domain?”;
- click on Form in the properties window;
- enter three form variables:
- newDomain – of type String – and deault expression “#{vocabularyComponent.getVocabulary(chooseDomain).getName()}” which shows the name of the target domain (i.e., chooseDomain);
- approveMove of type button;
- rejectMove of type button.
Below, the corresponding property screens:
In order to complete the exercise, we have to add Service Task that changes the status. This is explained in a separate article.
Defining a Service Task that Adds Attributes to an Asset
Assume we want to define a Workflow that whenever clicked from within an Asset’s page, the steward is prompted for a definition attribute. To do this:
- create a new User Task with Name “Provide definition”;
- create a new Service Task with Name “Store definition;”
For the User Task, we need a text area and a submit button:
- click on the Form tab in the properties window
- add a Form Variable “newDefinition” of type textarea that is required, readable and writable.
- click on the Main Config tab in the properties window
- enter as Candidate User: “role(Steward)”.
Next, the Service Task will store the definition as attribute for the term:
- click on the Main Config tab in the properties window;
- enter the following expression: ${attributeComponent.addDefinition(item.id,newDefinition)}
- this expression adds newDefinition as definition attribute value to item which refers to this asset on which the workflow is applied.
The result looks as follows:
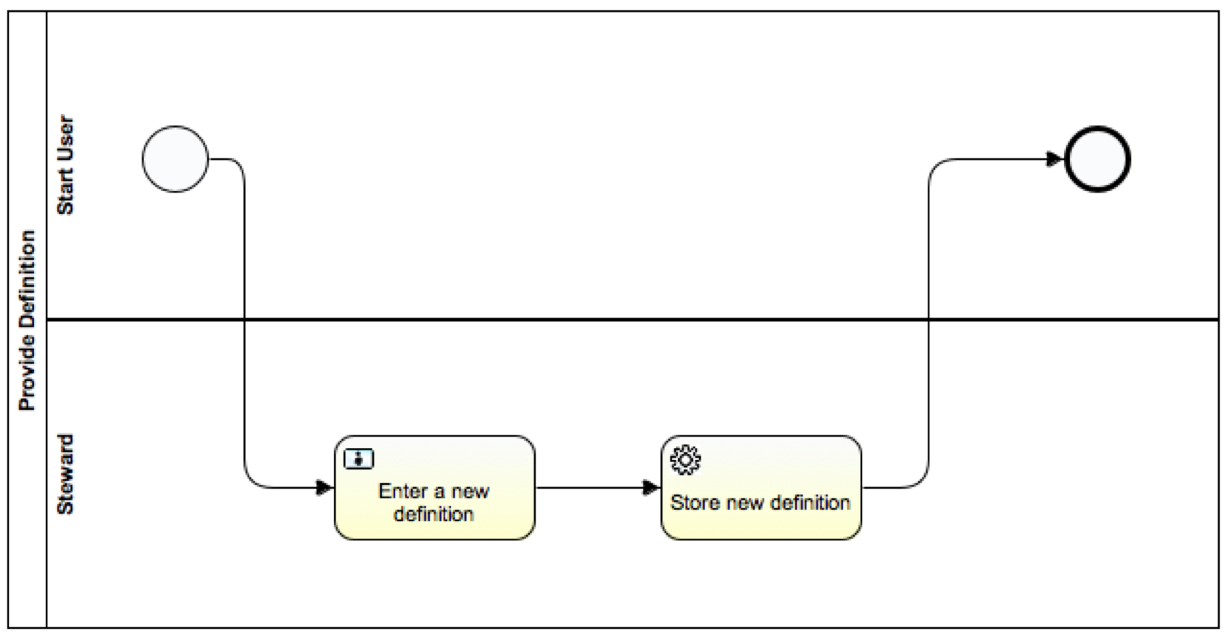
Now you could consider defining a call activity in our running example that calls this workflow. This example is simpler than the one with the voting sub-process because It does not require any input or output parameters. We only rely here on item bean which is passed on automatically.
[bok-callout]Task and Workflow Design Patterns
TIP All the above types of service and user tasks can be considered as task design patterns. As you will experience through practice, most workflows consist of combinations of these tasks along with call activities to embed other workflows. If you are not comfortable with defining the form variables, expressions, etc yourself just copy them from these patterns.[/bok-callout]
What is a form type?
Activiti provides the following form types that are used to type variables in the forms used by start events and user tasks. Furthermore, there are some configurations for form variables, some of them we touched upon in the running example. The complete listing for both is available at Developing Workflows
What is a user expression?
Activity provides the a number of User Expressions to indicate candidate users of User Tasks, or to use them as an argument in any other expression. The full list can be found in the user guide’s section on Managing Workflows (subsection User Expressions).
What is a business item?
A Business Item can by any item to which the running Workflow Definition instance is linked and on which it can perform actions. Very frequent, Workflow Definitions are started to handle tasks performed for one specific Business Item. It uniquely identifies the running Workflow Definition instance at any moment in time. In DGC a Business Item can be an Asset, Domain or Community. It is possible for a Workflow Definitions to not act on a Business Item at all. These Workflow Definitions are called global.
E.g., the following methods can be called on an Business Item. This can be found back in the java documentation on BusinessItemBean Class in com.collibra.dgc.core.workflow.activiti.bean.
String |
getCommunity()
Retrieve the community id of the business item if present.
|
String |
getConceptTypeName() |
String |
getId() |
String |
getName() |
Resource |
getResource() |
ResourceType |
getType() |
String |
getUrl() |
String |
getVocabulary()
Retrieve the id of the vocabulary of the business item, if possible, otherwise return null.
|
Other beans are listed in the user guide section on Developing Workflows (subsection Beans).
You have to login to comment.