
Walk-through
For a walk-through and configuration of the Workflow, refer to Walk Through the Propose New Business Term Workflow.
Implementation
Step 1: Create a new Activiti project and/or Activiti diagram
The creation of a new Activiti project/diagram is explained in the section on Setting Up Your Workflow Design Workbench.
Step 2: Create a Pool and Lanes
We refer to the section Designing Your First Workflow From Scratch, subsection “Defining a Pool and Lanes” for an explanation on how to change the identifier, name and description.

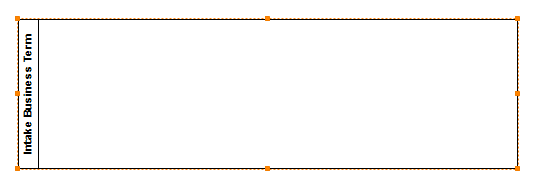
Step 3: Change the Identifier, Name and Description of the Process
We refer to the section Designing Your First Workflow From Scratch, subsection “Change the Identifier, Name and Description of the Process” for an explanation on how to change the identifier, name and description. For this case, name the Workflow (e.g., the default would be “Intake Business Term”) and give it an identifier (e.g., the default name would be “intakeBusinessTerm”).
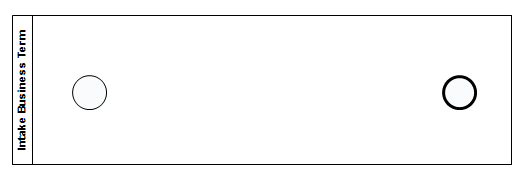
Step 4: Create a Start and End Event
We refer to the section Designing Your First Workflow From Scratch, subsection “Create a Start / End Event” for a general explanation.
Step 5: Define the Start Form on the Start Event.
We refer to the Developing Workflows section of the Administrator’s Guide, subsection “Forms” for a general explanation.
- Click on the Start Event circle and open the Form tab in the properties window to change its properties.
2. Create the form properties.
Refer to the Developing Workflows section of the Administrator’s Guide, subsection “Forms – Form Types” (Developing Workflows) for a general explanation of form options and settings.
Go to Start Event > Properties > Form > New Button to create a new form property.
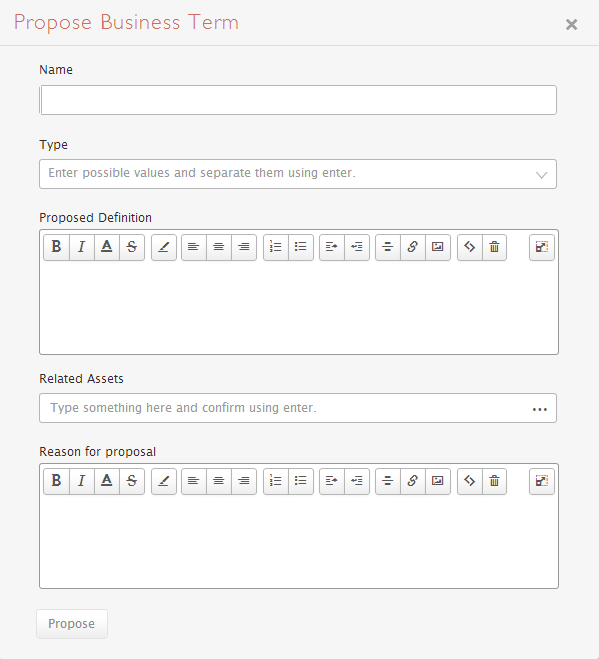
Start Form Property 1: The Proposed Asset’s Name
This form property will produce a text box prompting the user to enter a name (signifier) for the new Asset.
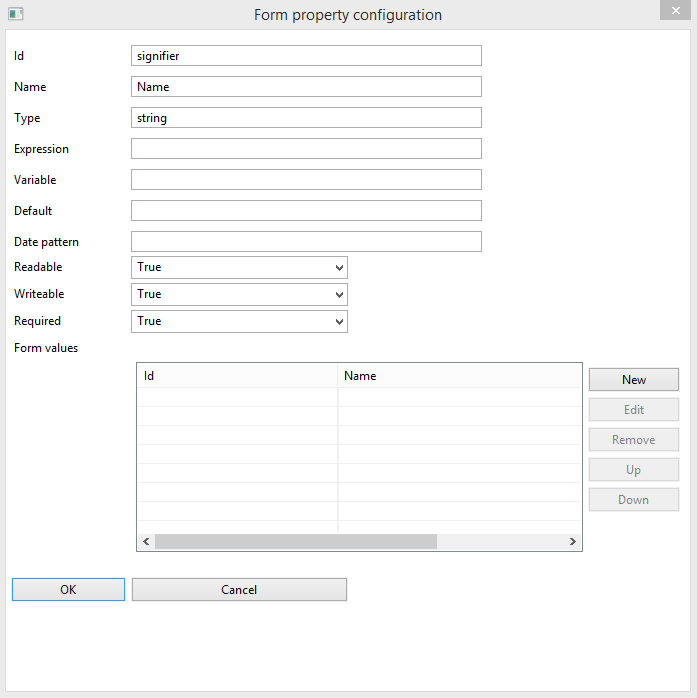
- Id: signifier – The Id is determined by the developer.
- Name: Name – This gives the form user a label for the signifier text box.
- Type: string – This text box will hold string character information.
- Readable: True – Setting Readable to true allows the user to see the text box.
- Writeable: True – This allows the user to write into the text box.
- Required: True. – The user cannot leave the name of the Asset blank in order to proceed.
This is the produced result:

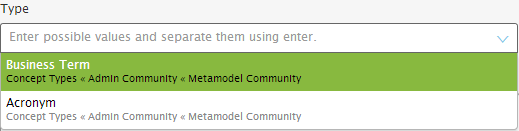
Form Property 2: The Proposed Asset’s Asset Type
This form property will produce a drop-down box on the start form for the user to declare the Asset Type. By default, the new Asset Type can be either a Business Term or an Acronym. Note, that you can customize this yourself so that the drop-down corresponds to your own Asset Types.
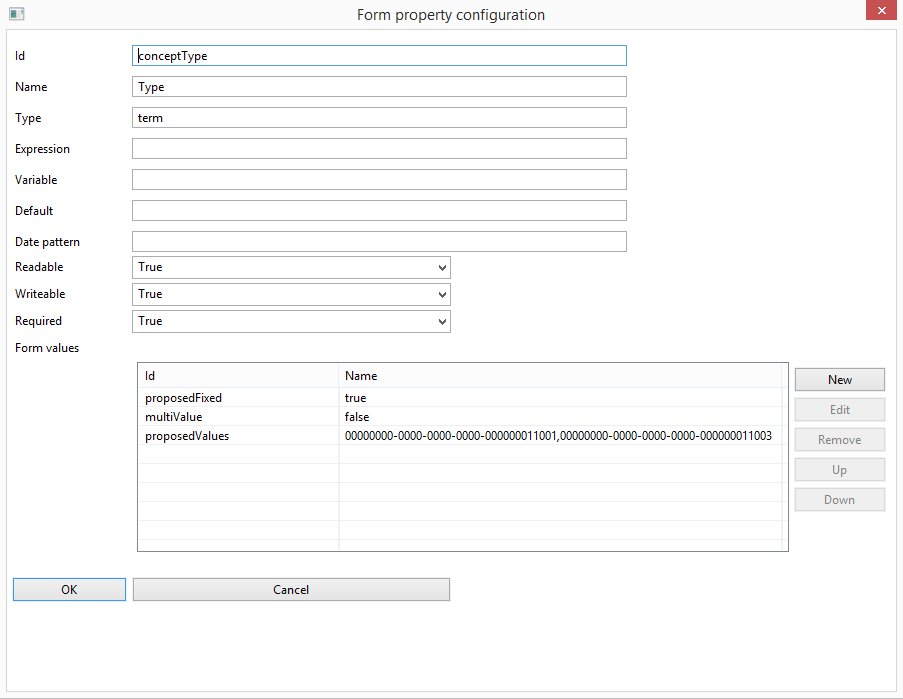
- Id: conceptType – The Id is determined by the developer.
- Name: Type – This gives the form property user a label for the conceptType text box.
- Type: term – The user needs to select from already existing Asset Types. The two options will be Business Term and Acronym. The Form Values below section will limit the selection options.
- Readable: True – The user should see this form property. It is not hidden.
- Writeable: True – The user can write text into this form property.
- Required: True – This form property cannot be left blank.
- Form Values: Refer to the Developing Workflows section of the Administrator’s Guide, subsection “Forms – Custom Dropdown Form Types” for an explanation of setting form values for a dropdown.
- proposedFixed: true – This fixes thet options in the drop-down box;
- multiValue: false – The user is only allowed to select one option in the drop-down box;
- proposedValues – the proposed values are UUIDs for Business Term and Acronym resp.: 00000000-0000-0000-0000-000000011001,00000000-0000-0000-0000-000000011003.
The user is only allowed to create Business Terms and Acronyms with this form. 00000000-0000-0000-0000-000000011001 and 00000000-0000-0000-0000-000000011003 are the UUIDs for Business Term and Acronym.
This is the end result:
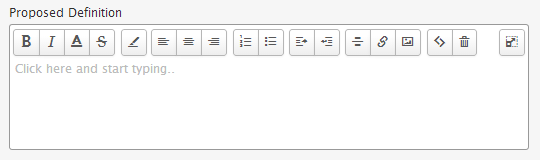
Form Property 3: The Proposed Asset’s Definition
This form object creates a text area on the form for the user to enter a definition.
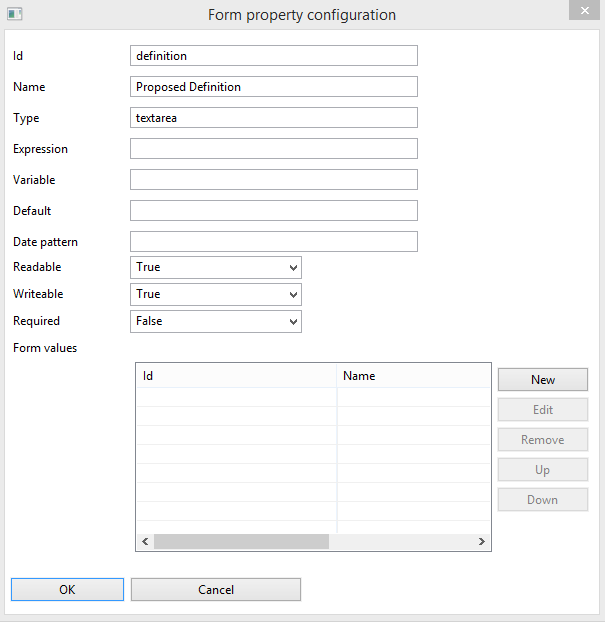
This is very similar to Form Property 1 except for it uses a textarea Form Type instead of a string. This will provide the user with a rich text editing area. Required is also set to False meaning that a definition is not required and can be left blank.
This is the end result:
Form Property 4: The Proposed Asset’s Related Assets
This form property will result in a drop-down list on the start form for the user to name a related Business Asset.

- Id: usesrelation – The Id is determined by the developer.
- Name: Related Assets – This gives the form user a label for the usesrelation text box.
- Type: term – The user needs to select a related Asset that already exists. The term form type allows this functionality by setting parameters. See the Form Values section below.
- Readable: True – The user should see this form object. It is not hidden.
- Writeable: True – The user can input text into this object.
- Required: False– This can be left blank if the user does not want to relate any other Business Assets.
- Form Values: Refer to the Developing Workflows section of the Administrator’s Guide, subsection “Forms – Custom Dropdown Form Types” for an explanation of setting form values for a dropdown.
- mulitValue: true: – The user is allowed to select and relate more than one Asset on the form.
- conceptType: 00000000-0000-0000-0000-000000031000 – This is the UUID for the general type of Asset. This means that the newly proposed term can be related to any existing Asset no matter what the type.
[bok-callout]The Form Value conceptType does not appear as a Form Value for the “Custom Drop Down Form Types” in the Administrator’s Guide. proposedValues can be used and will achieve the same result.[/bok-callout]
Form Property 5: Notes
The notes are entered into a textarea. This is similar to Form Property 3.
Form Property 6: The Submit Button
This is the button that will submit the form.
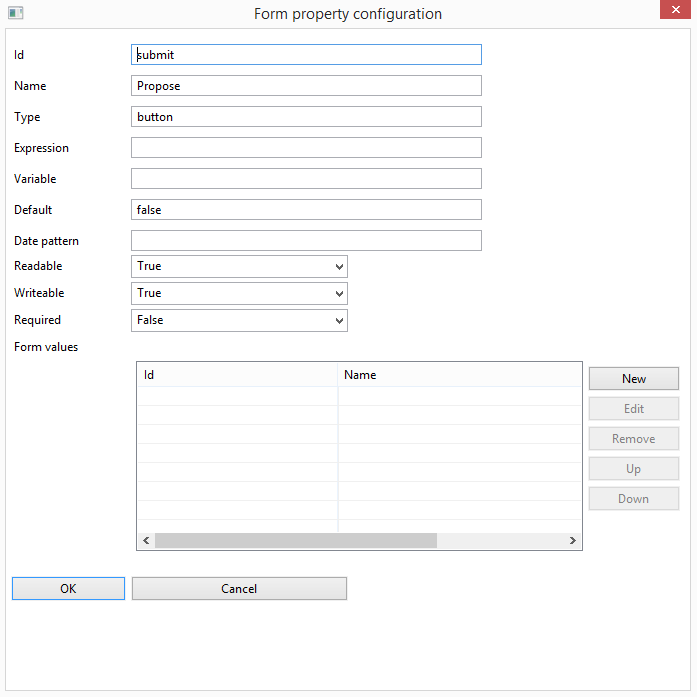
- Id: submit – The Id is determined by the developer.
- Name: Propose – This is the label that will appear on the button.
- Type: button – The Form Type is button.
- Default: false– Set the button to its unpressed state of false.
- Readable: True – The user should see this form object. It is not hidden.
- Writeable: True – The user can press the button.
- Required: False
Result
This is the end result of creating the form:
Step 5: Create the Configuration Variables.
Start forms are also used to define the Configuration Variables which can be set in the workflow definition. For more information about them, please refer to the corresponding section in the Managing Workflows.
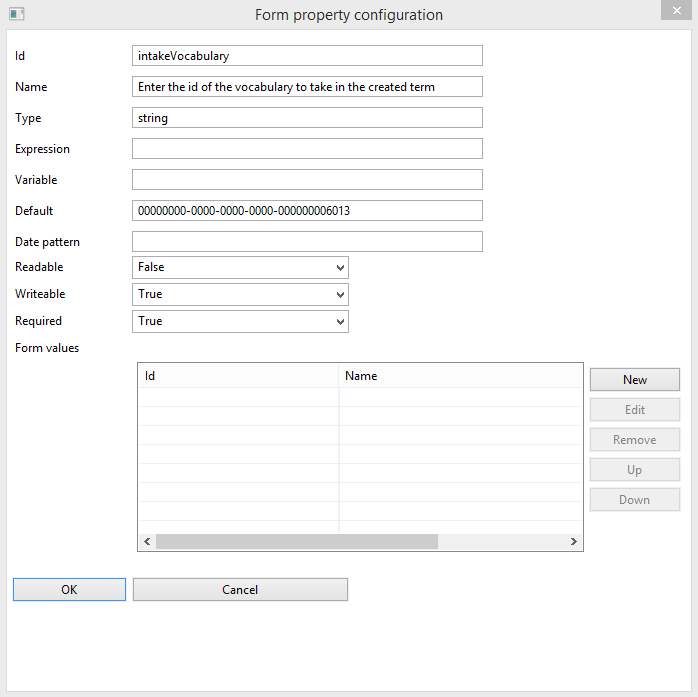
- Id: intakeVocabulary– The Id is determined by the developer.
- Name: Enter the id of the vocabulary to take in the created term – The name should be a description of the variable’s purpose. This will be useful when changing variables in the DGC Settings.
- Type: string
- Default: 00000000-0000-0000-0000-000000006013 – This is the UUID for the domain where you want to take in the created term.
- Readable: False – This is not a form type, it is a Configuration Variable that will be unseen to workflow participants. Therefore it is marked False.
- Writeable: True
- Required: True
Setting the intakeVocabulary variable to unreadable will hide it from the user but will list it in the list of variables in the configuration screen of the workflow as illustrated below.

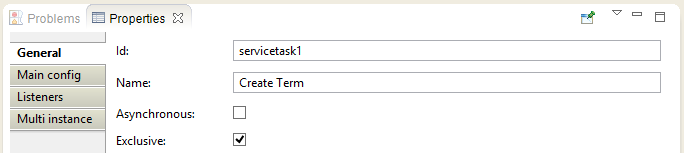
Step 6: Add a Service Task to Add theTerm to the Selected Domain
We refer to the section Designing Your First Workflow From Scratch, subsection “Defining a Service Task” for a general explanation. Then connect the workflow with sequenceFlows.
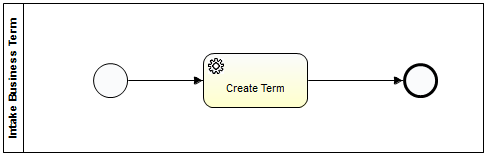
The Term Intake Delegate Service Task will use the information gathered with the start form to create a term in the Business Glossary.
Refer to the Developing Workflows section of the Administrator’s Guide, subsection “Delegates” for a general explanation of Delegates.
- Name the Service Task: the name is only to describe the task within the diagram. Name it something meaningful.
2. Define the Service Task
See “Defining a Service Task” in Designing Your First Workflow From Scratch for general information.
Define the Service Task with the Term Intake Delegate:

See “Defining a Service Task to Change the Status of an Asset” in Designing Your First Workflow From Scratch for a specific example of how to select the Service Class in Activiti.
3. Set the input fields
The input fields are determined by the Delegate Class. Add these fields into the “Fields” section as shown below:
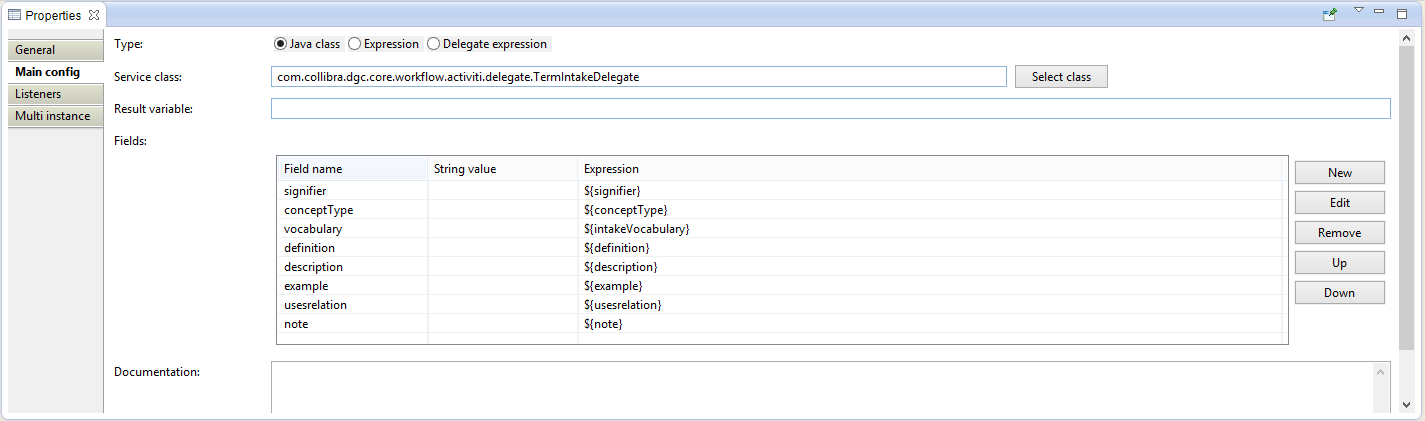
The variables come from the start form. The variables description and example do not exist, but they are not needed and can be ignored.
In this case, it calls a Java service class in the Collibra API called TermIntakeDelegate which as it name suggests is a basic constructor to create a new term in the application. To this end, we have to map all form variables define in the start event on parameters of the delegate as is shown in the Fields. E.g., signifier is a form variable which is turned into an expression “${signifier}”. The ${} wrapping is a JUEL expression to turn the variable in to a argument for the method: in other words it will bind/instantiate the variable.
[bok-callout]If you want to have more information about the fields the TermIntake delegate is using, go to the Java documentation hosted by your instance. To this end, browse to the URL: http://dg.example.org/docs/java/index.html where you replace dg.example.org with your own URL. Then, search for “TermIntake” in the package com.collibra.dgc.core.workflow.activiti.delegate. Or expand the link below:[/bok-callout]
Result
The result is a completed workflow. For information about how to deploy this workflow, refer to subsection “Managing Workflow Definitions – Deploying” of Managing Workflows in the Administrator’s Guide.
You have to login to comment.