
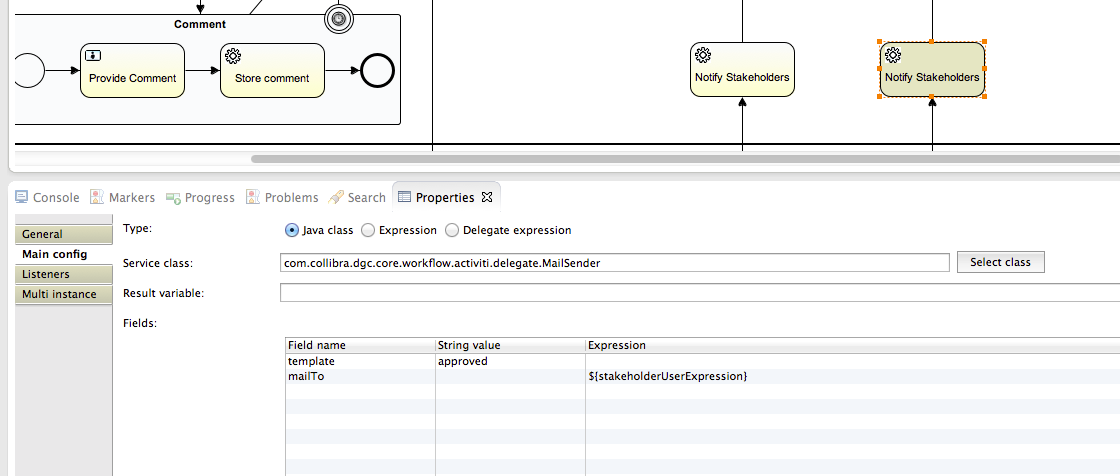
Workflows usually contain service tasks that call MailTask delegate methods to send an email notification with a certain content and formatting (field: template) and recipient (field: mailTo). This is explained in the admin guide section on Developing Workflows. The packaged workflows already provide basic templates. However, you can customize exiting ones or even create new ones for new workflows.
Locating Packaged Email Templates
First we need to locate the template files. The packaged email templates are of file type .vm and are located in the WAR file. You can browse them by unarchiving the dgc.war file and go to the subfolder “dgc/WEB-INF/lib/”. There, you unarchive the JAR “com.collibra.dgc.core-4.3.1-FINAL.jar which contains the folder “email-templates”, as illustrated below.
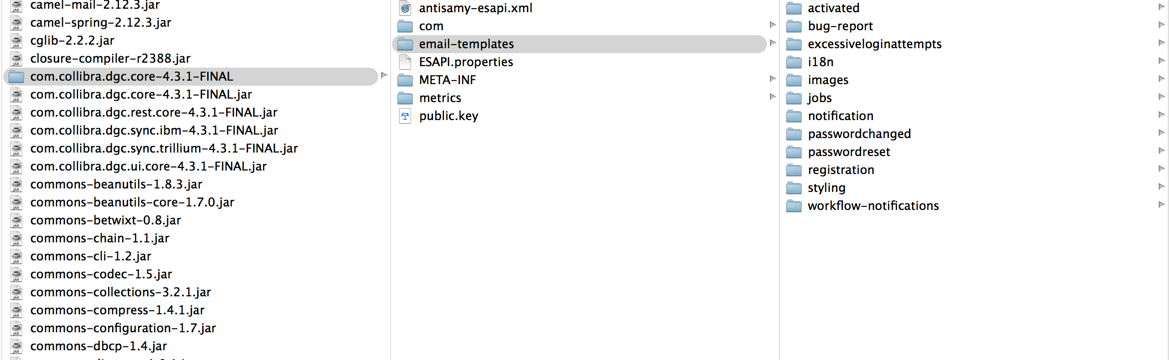
The folder “email-templates” has several subfolders here that contain velocity (.vm) files. Each of them represents a set of email templates that defines the content and formatting of the email notifications for a particular workflow or context. Consider for example the “workflow-notifications” subfolder. Every subfolder has a name that corresponds literally to the processid of a packaged workflow. E.g., the folder “approvalProcess” contains the email templates for the packaged Approval Workflow with the same process-id.
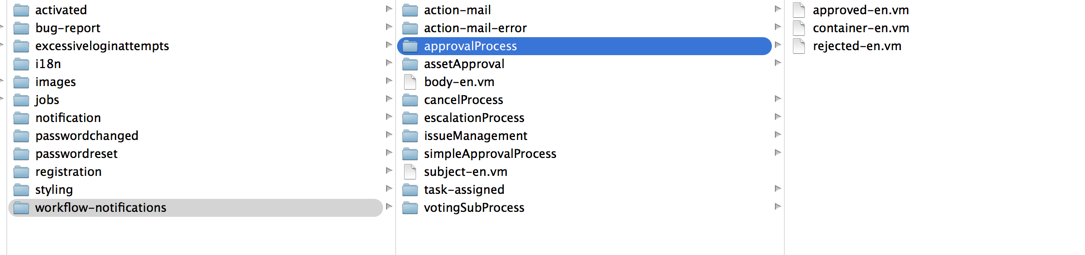
The packaged Approval Process workflow uses three email templates: container, approved and rejected. Consider the example in the admin guide’s section on Developing Workflows. A MailSender delegate will call “approved-en.vm” by setting the template parameter to “approved”. Hence, without the “-en.vm” suffix. You can define multiple translations of the same template, e.g., for French “approved-fr.vm or for German “approved-de.vm. Depending on the locale settings of a user, the right template translation will then be triggered.
You can open a “.vm” file with a text editor or a HTML/XML editor. E.g., the packaged “approved-en.vm” looks as follows:
<tr><td>Term <a href="$item.url">$item.name</a> was approved.</td></tr>
The .vm file contains a mix of plain text as well as script to dynamically call data from the API. You can call also virtually call any form property or execution variable that you declared in the workflow: e.g., $item.url resolves to the url and $item.name to the name of the term. Both refer to the global variable “item” which refers to the asset, domain or community that is the subject of the workflow. This template results in the email line “Term TEST TERM 6 AUG was approved”.

The approvalProcess folder – just like any other folder, also contains always a “container-en.vm” which defines the block in which individual messages are grouped in an email. The example above shows only one notification (i.e., “Term TEST TERM 6 AUG was approved” but they could also be grouped depending on how many notifications were queued and what the frequency of notification is. Below the code in container-en.vm for the Approval Process: line 5 defines the header text that appears in red “Simple approval process messages”. The other parts define several spacings and font settings in standard HTML.
<div style="margin:10px;">
  <table border="0" cellpadding="0" cellspacing="0" width="100%" style="border-bottom: 2px solid #ba3a4c; padding-bottom: 10px"><!-- begin:title -->
    <tbody>
    	<tr>
    		<td style="color:#ba3a4c; line-height:9px">Approval process messages</td>
    	</tr>
    </tbody>
</table>
</div><!-- end:title -->
<table border="0" cellpadding="3" cellspacing="0" width="100%" style="margin: 10px;"><!-- begin:activity -->
	<tbody>
		$content
    </tbody>
</table>
If you navigate further in the other subfolders of “email-templates” you will also find templates for action mails, account activation,etc.
Locating the General Email Template Logo and Styling
The screenshot of the email above is a grouping of notifications for a specific workflow for a specific time period. All email notifications are grouped per workflow (according to container-en.vm). These groupings are in turn embedded in the general styling template located in “email-templates/styling/styling.vm” folder. Below you can see an illustration of an email with a set of task notifications using the default styling template:
The styling template defines the logo (by default Collibra logo found in “”${baseUrl}resources/email-templates/images/logo.png”), the size and color of the green bar, and the rendering of title ($emailTitle) and date it was sent out ($sendDate). Finally the JUEL expression “$content” then will then be instantiated by the containers of messages for each workflow.
#set($baseUrl = $applicationComponent.getBaseURL())
#set($sendDate = $datetool.format("long_date", $datetool.getDate(), $userComponent.getCurrentLocale()))
<!DOCTYPE HTML>
  <html>
    <head></head>
    <body style="background: white; margin: 0px; font-family: Lucida Grande, Arial, Verdana; font-size: 12px;">
    	<table cellpadding="0" cellspacing="0" border="0" width="100%">
			  <tbody>
			  	<tr>
				    <td>
				      <a href="${baseUrl}" target="_blank">
				        <img alt="Collibra Logo" src="${baseUrl}resources/email-templates/images/logo.png" style="margin: 10px 0px 10px 30px" border="0" height="36" width="198">
				      </a>
				    </td>
				  </tr>
				  <tr>
				    <td bgcolor="#FFFFFF" height="3"></td>
				  </tr>
				  <tr bgcolor="#97C859">
				    <td>
				      <table style="background-image: url('${baseUrl}resources/email-templates/images/menubg.png'); background-position: 0px -25px;" cellpadding="3" cellspacing="0" background="${baseUrl}resources/email-templates/menubg.png" height="35" width="100%">
				        <tbody>
				          <tr style="font-size: 13px; text-shadow: 0 1px 0 rgba(255, 255, 255, 0.2); font-weight: bold;">
				             <td style="padding-left: 25px; color: #FFFFFF; text-shadow: 0 1px 0 rgba(0, 0, 0, 0.2);" align="left">$emailTitle</td>
				             <td style="padding-right: 35px; color: #FFFFFF; text-shadow: 0 1px 0 rgba(0, 0, 0, 0.2);" align="right">$sendDate</td>
				          </tr>
				        </tbody>
				      </table>
				    </td>
				  </tr>
      		$content
      		<tr style="color: #c3c3c3; font-size: 10px;">
					  <td style="padding: 10px">
					     <center>$msg.get("email.footer")</center>
					  </td>
					</tr>
     		</tbody>
			</table>
    </body>
  </html>
We have located the general email template “styling.vm”, and learned how it embeds “container.vm” for every set of notifications (e..g, approved-en.vm) per workflow. Next, we explore how to customize them and create new ones.
Customizing the Logo and Styling of the General Email Template
Every template in the email-templates directory can be overridden in the home directory ‘$HOME’ of your Collibra installation. E.g., if you want to override the styling.vm, you create a ‘$HOME/email-templates/styling’ sub-folder and copy the original “styling.vm”. Now you can change it to the way you like it. The software will always prefer the version of the file in the $HOME directory to default lay-out.
Some of the most common overrides:
- replace the “collibra” header logo with your company logo: by replacing line 12 the file name with a corresponding image file in the “images” folder in the home directory”:
- change the header title to the name of your Collibra DGC instance: e.g., “Data Spotlight”;
- change the colour of the titlebar: line 12: e.g., <tr bgcolor=”#00A4E4″>;
- add a footer such as “Thank you for your participation …”
This will affect every single email.
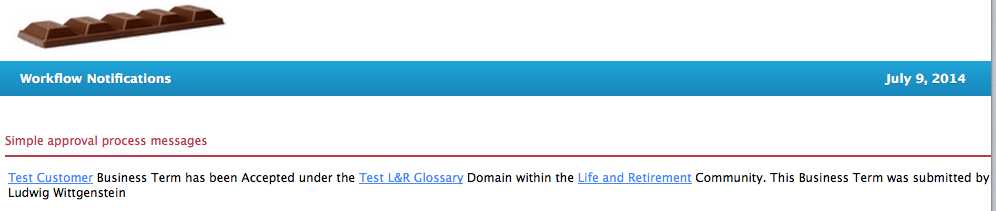
For example at a fictional chocolate factory this may look as follows:
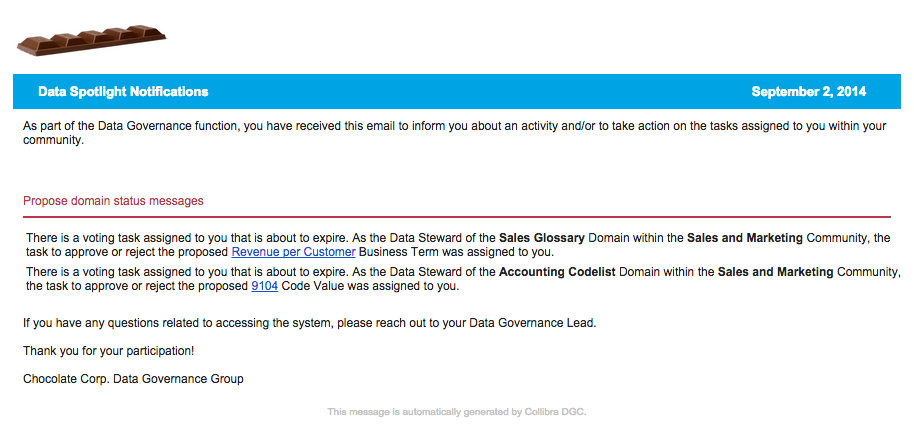
Customizing the Content of Non-grouped Action Emails
See also the user Admin Guide’s section on Developing Workflows.
The relevant excerpt of the “non-grouped.vm” template for the adaptation for the chocolate factory is shown below. The default file is overridden by this one by adding it in the $HOME directory under a subfolder ’email-templates/workflow-notifications/action-mail/’ – a folder structure corresponding to the dgc.war one. The template refers to standard sentences that are defined in the accompanying ‘i18n/en.i18n’ file located in a subfolder.
For the email-headers:
-
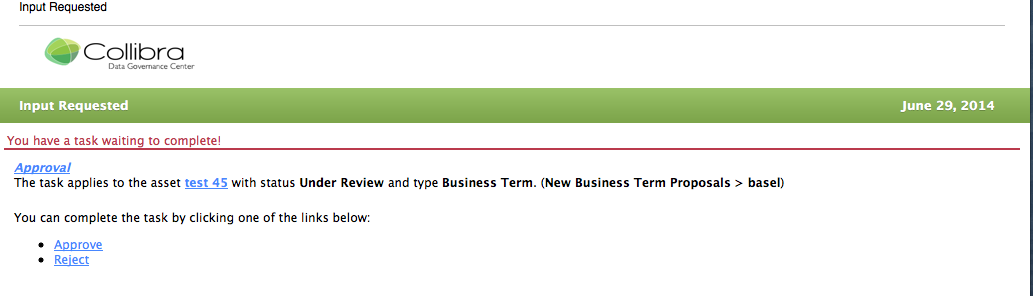
Email subject is by default
Input Requested
if not specified. The subject can be dynamically specified in the task properties in the workflow definition. In the example above this is “Data Steward : Review request to deprecate term” This is explained in the Admin Guide’s section on https://compass.collibra.com/display/DOC/Developing+Workflows, by scrolling down to “Action Emails” subsection.
For the email body:
- The first line: Approval is generated by the “task.new.assigned” with two parameters, i.e. the URL and title of the task.
-
The second line
The task applies to the asset 1 July Term with status Candidate and type Business Term. (brussel > Life and Retirement)
is generated by the sentence pattern “task.new.assigned.asset” in the file ‘en.i18n’. You can override this language pattern by going to Settings>Language as explained in the admin guide section on Changing Translations.
-
The third line
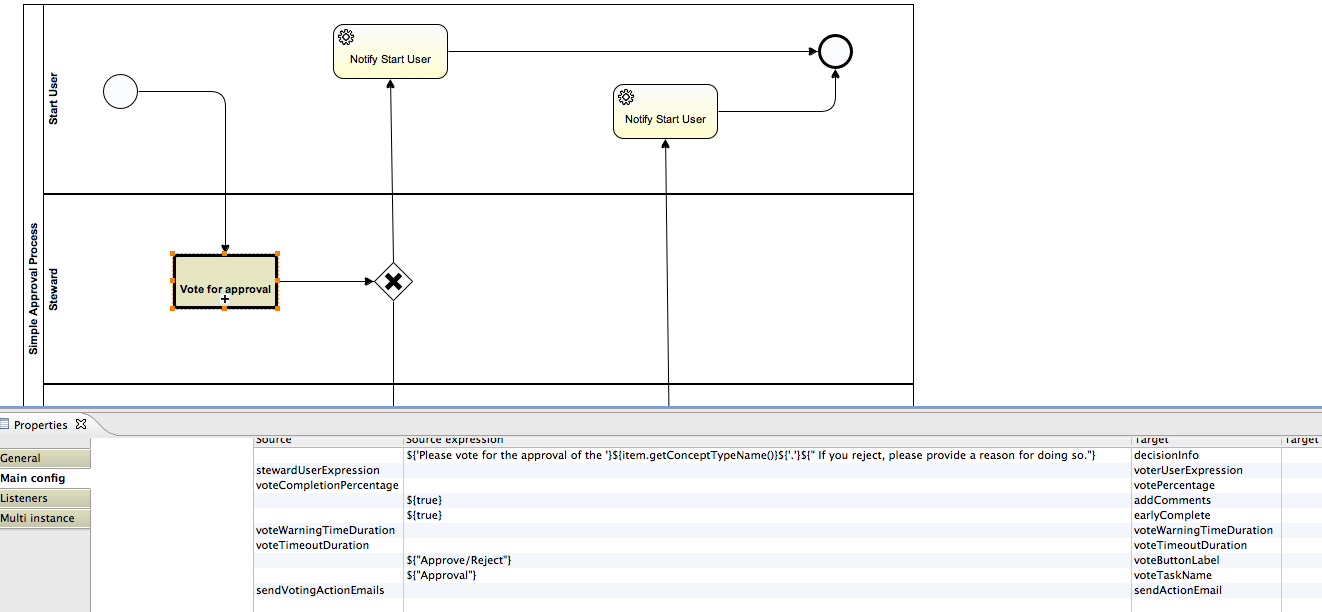
“Please vote for the approval of the Business Term. If you reject, please provide a reason for doing so.
is generated by the variable “task.description” which is fetched from the workflow definition’s documentation part. In this case, the task takes decisionInfo variable from the simple approval workflow as shown on the first line of the form properties.
-
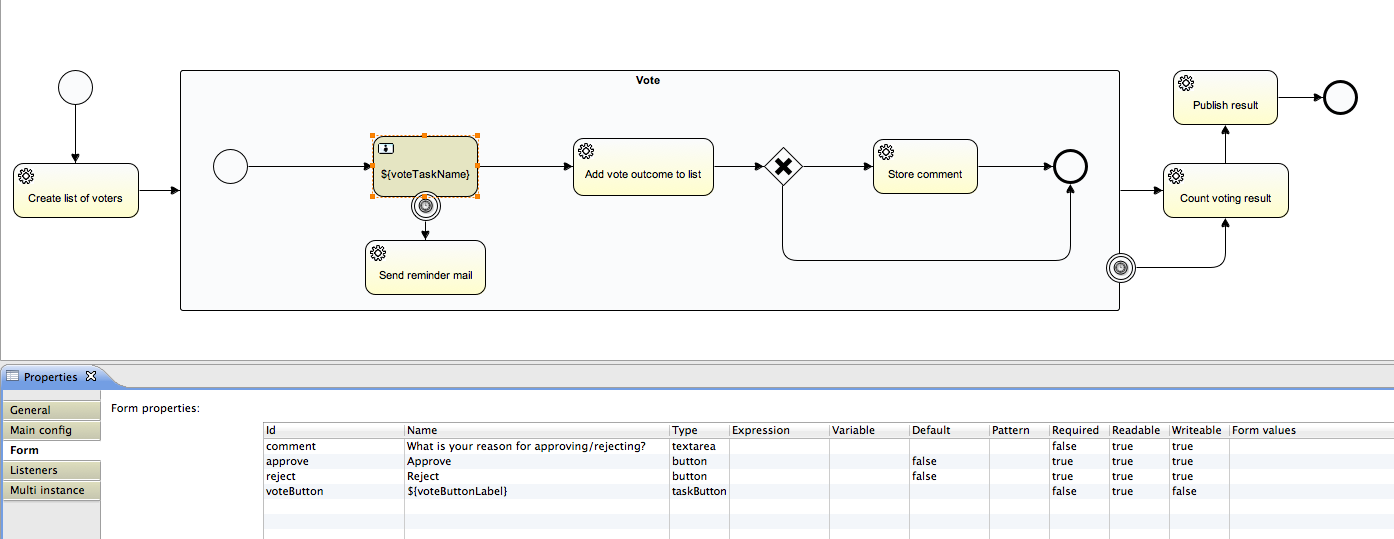
The fourth line:
is generated by the language pattern “task.newactions” in ‘en.i18n’ file, and is based on the number of actions that have been defined in the workflow. E.g., here this is generated by the highlighted user task in voting subprocess called by the simple approval. The button labels are defined in the form properties.

-
the fifth line:
If you have any questions related to accessing the system, please reach out to your Data Governance Lead. Thank you for your participation! The Chocolate Factory Data Governance Group.
is verbatim at the end of the template with possible HTMLmarkup.
##################################
###
### Non-grouped e-mails
###
### - Is about a single tasks.
### - Can hold activity, multiple attributes and relations.
###
##################################
<tr>
<td style="padding:10px">
#if ($user.isGuestUser())
#set($url = $item.url + '#signinrequired=false&task-id=' + $task.getId() + '&user-id=' + $user.getId())
#else
#set($url = $item.url + '#signinrequired=true&task-id=' + $task.getId())
#end
<table border="0" cellpadding="3" cellspacing="0" width="100%" style="border-bottom:2px solid #ba3a4c;"><!-- begin:title -->
<tbody>
<tr>
<td style="color:#ba3a4c; line-height:9px">$msg.get("task.new.title.non-grouped")</td>
</tr>
</tbody>
</table><!-- end:title -->
<table border="0" cellpadding="3" cellspacing="0" width="100%">
<tbody>
<!--<tr style="font-weight: bold; color: #ba3a4c; padding: 10px 10px 0 10px;">$!msg.get('task.title')</tr>-->
<tr>
<td style="padding: 10px; color: black;">
$!msg.get('task.new.assigned', "$!url", "$!{task.title}")
#if ($item.id)
#set($resource = $item.resource)
#if ($typetool.isTerm($resource))
$!msg.get('task.new.assigned.asset',
"$!{item.url}",
"$!{item.name}",
"$!{resource.status.signifier}",
"$!{item.conceptTypeName}",
"$!{resource.vocabulary.name}",
"$!{resource.vocabulary.community.name}")
#elseif($typetool.isVocabulary($resource))
$!msg.get('task.new.assigned.domain',
"$!{item.url}",
"$!{item.name}",
"$!{resource.vocabulary.community.name}")
#elseif($typetool.isCommunity($resource))
$!msg.get('task.new.assigned.domain',
"$!{item.url}",
"$!{item.name}")
#end
#end
#if ($task.description) $task.description #end
<table border="0" cellpadding="3" cellspacing="0" width="100%" style="padding: 10px 0;">
<tbody>
#if($includeActivityFilter)
<tr><td colspan="2" style="font-weight: bold; color: #ba3a4c; padding: 10px 0;">$!msg.get('activity.title')</td></tr>
<tr>
<td colspan="2">
#renderResources($filteredStream)
</td>
</tr>
#end
#if($includeAttributes && $attributes.size() > 0)
<tr><td colspan="2" style="font-weight: bold; color: #ba3a4c; padding: 10px 0;">$!msg.get('attributes.title')</td></tr>
#foreach($attribute in $attributes)
<tr style="color: black;">
<td style="width:15%; vertical-align: top; padding-top: 10px;">
<b>$attribute.getLabel().getSignifier():</b>
</td>
<td style="width: 85%; vertical-align: top; padding-top: 10px;">
$attribute.getValue()
</td>
</tr>
#end
#end
#if($includeRelations && $relations.size() > 0)
<tr><td colspan="2" style="font-weight: bold; color: #ba3a4c; padding: 10px 0;">$!msg.get('relations.title')</td></tr>
#foreach($relation in $relations)
<tr>
<td style="color: black; padding-top: 10px;" colspan="2">
<b>$relation.getSource().getSignifier()</b> $relation.getType().getRole()/$relation.getType().getCoRole() <b>$relation.getTarget().getSignifier()</b>
</td>
</tr>
#end
#end
</tbody>
</table>
<font color="black">$msg.get('task.new.actions')
${actionContents}</font>
If you have any questions related to accessing the system, please reach out to your Data Governance Lead. Thank you for your participation!
The Chocolate Factory Data Governance Group
</td>
</tr>
</tbody>
</table>
</td>
</tr>
Adding New Email Templates for Your Custom Workflow
Consider the example of a term onboarding workflow definition, attached here and illustrated below:
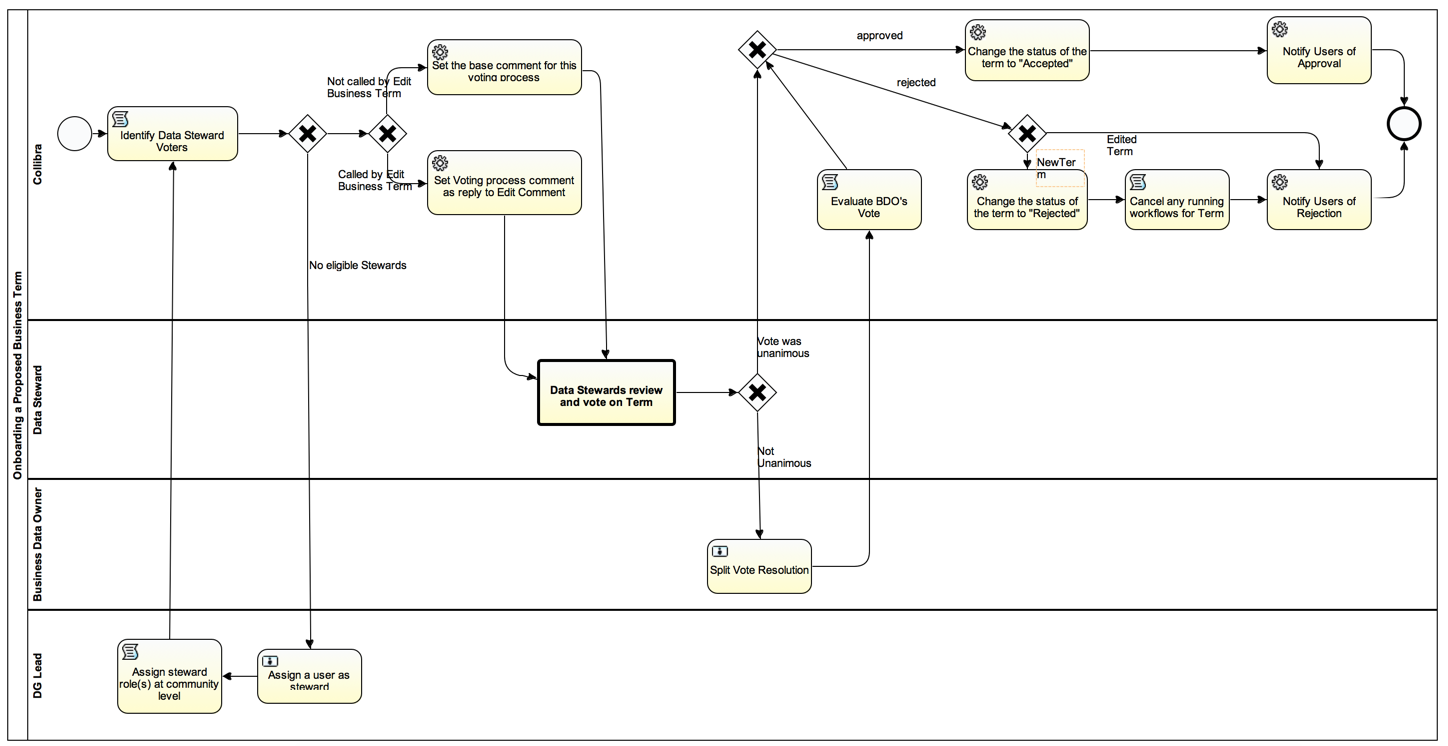
The onboarding workflow consists of two notifications (at the end of):
- one to notify users of the approval of the term
- one to notify the users of the rejection of a term.
Create a new subfolder “email-templates/workflow-notifications/onboarding” in your home directory where “onboarding” is the process ID for your workflow definition. First we create the container.vm file, then approval-en.vm and rejected-en.vm for the respective notifications.
Create a Container Template
- copy to the container-en.vm from a packaged workflow, e.g., “simpleApprovalProcess” found in “com.collibra.dgc.core-4.3.0-FINAL/email-templates/workflow-notifications/simpleApprovalProcess folder in your DGC WAR file.
- paste container-en.vm into the new folder “onboarding”.
- now re-label, on line 5, the header “Simple approval process messages” in the pasted container-en.vm file to “Term onboarding process messages”.
<div style="margin:10px;">
  <table border="0" cellpadding="0" cellspacing="0" width="100%" style="border-bottom: 2px solid #ba3a4c; padding-bottom: 10px"><!-- begin:title -->
    <tbody>
      <tr>
        <td style="color:#ba3a4c; line-height:9px">Term onboarding process messages</td>
      </tr>
    </tbody>
  </table>
</div><!-- end:title -->
<table border="0" cellpadding="3" cellspacing="0" width="100%" style="margin: 10px;"><!-- begin:activity -->
  <tbody>
    $content
    </tbody>
</table>
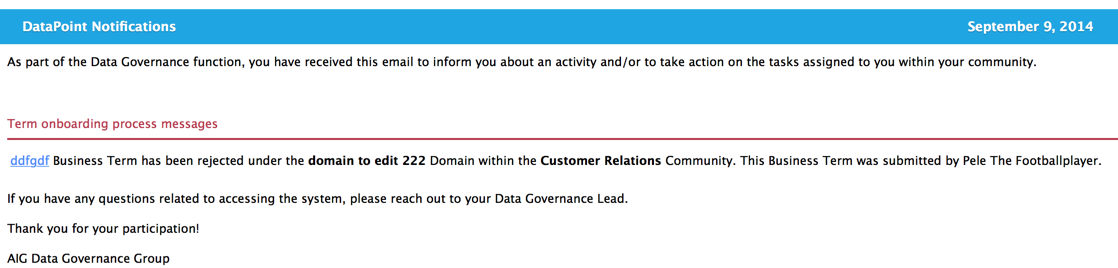
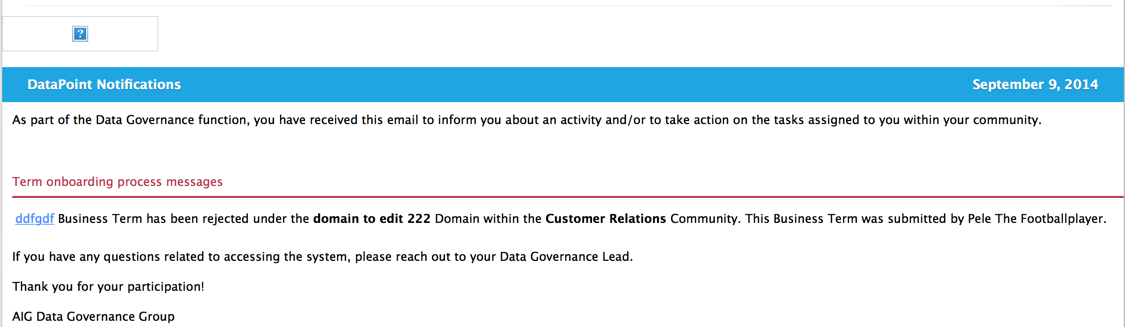
The software will now take this .vm-file to format the emails container title to “Term onboarding process messages” as follows:
Create an Email Template for the Notification of Onboarding Accepted
Perform the following steps:
- copy an existing template from a packaged workflow, e.g., “the approved-en.vm” template for the “simpleApprovalProcess” found in “com.collibra.dgc.core-4.3.0-FINAL/email-templates/workflow-notifications/simpleApprovalProcess folder in your DGC WAR file.
- paste container-en.vm into the folder “onboarding” in your home directory, and rename it to accepted-en.vm (where the part before “-en.vm” corresponds to the string being called in the field of the MailSender task in the workflow.
- open the file and change the message template to your likings. You can call any component on the API to do it.
The result is shown below:
<tr><td><a href="$item.url">$item.name</a> $item.conceptTypeName has been $item.resource.status.signifier under the <a href="$item.resource.vocabulary.url">$item.resource.vocabulary.name</a> Domain within the <a href="$item.resource.vocabulary.community.url">$item.resource.vocabulary.community.name</a> Community.
This $item.conceptTypeName was submitted by $userComponent.getUser($item.resource.getCreatedBy()).getFullName().</td></tr>
This template will be embedded within the container template and grouped with others.
Create an Email Template for the Notification of Onboarding Accepted
Perform the following steps:
- copy an existing template from a packaged workflow, e.g., “the approved-en.vm” template for the “simpleApprovalProcess” found in “com.collibra.dgc.core-4.3.0-FINAL/email-templates/workflow-notifications/simpleApprovalProcess folder in your DGC WAR file.
- paste container-en.vm into the folder “onboarding” in your home directory, and rename it to rejected-en.vm (where the part before “-en.vm” corresponds to the string being called in the field of the MailSender task in the workflow.
- open the file and change the message template to your likings. You can call any component on the API to do it.
The result is shown below.
<tr><td><a href="$item.url">$item.name</a> $item.conceptTypeName has been $item.resource.status.signifier under the <a href="$item.resource.vocabulary.url">$item.resource.vocabulary.name</a> Domain within the <a href="$item.resource.vocabulary.community.url">$item.resource.vocabulary.community.name</a> Community.
This $item.conceptTypeName was submitted by $userComponent.getUser($item.resource.getCreatedBy()).getFullName().</td></tr>
This template will be embedded within the container template and grouped with others.
You have to login to comment.